HP Indigo WS6000 Indigo Technical Tips and Workarounds - Page 63
White ink, Standard method, Optical Density, Inherit color calibration, Scroll, Part Numbers
 |
View all HP Indigo WS6000 manuals
Add to My Manuals
Save this manual to your list of manuals |
Page 63 highlights
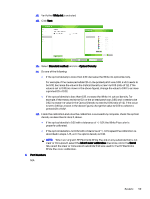
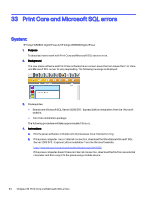
xii. Verify that White ink is selected. xiii. Click Next. xiv. Select Standard method, and click Optical Density. xv. Do one of the following: ● If the optical density is more than 0.32, decrease the White ink optical density. For example, if the measured white OD on the printed patch was 0.36, and it needs to be 0.32, decrease the value in the Optical Density screen by 0.08 (ratio of 1:2). If the value is set to 0.48 (as shown in the above figure), change the value to 0.40 to achieve a printed OD of 0.32. ● If the optical density is less than 0.32, increase the White ink optical density. For example, if the measured white OD on the printed patch was 0.30, and it needs to be 0.32, increase the value in the Optical Density screen by 0.04 (ratio of 1:2). If the value is set to 0.48 (as shown in the above figure), change the value to 0.52 to achieve a printed OD of 0.32. xvi. Finish the calibration and once the calibration is successfully complete, check the optical density as described in step 5, above. ● If the optical density is 0.32 with a tolerance of +/- 0.01, the White Plus color is properly calibrated. ● If the optical density is not 0.32 with a tolerance of +/- 0.01, repeat the calibration as described in steps 4-15, until the optical density is 0.32. NOTE: When working with HP ElectroInk White Plus ink on any substrate that is not clear or transparent, select the Inherit color calibration check box, and in the Scroll tab, select the clear or transparent substrate that was used for the HP ElectroInk White Plus color calibration. 4. Part Numbers N/A System: 59
-
 1
1 -
2
-
3
-
4
-
5
-
6
-
7
-
8
-
9
-
10
-
11
-
12
-
13
-
14
-
15
-
16
-
17
-
18
-
19
-
20
-
21
-
22
-
23
-
24
-
25
-
26
-
27
-
28
-
29
-
30
-
31
-
32
-
33
-
34
-
35
-
36
-
37
-
38
-
39
-
40
-
41
-
42
-
43
-
44
-
45
-
46
-
47
-
48
-
49
-
50
-
51
-
52
-
53
-
54
-
55
-
56
-
57
-
 58
58 -
 59
59 -
 60
60 -
 61
61 -
 62
62 -
 63
63 -
 64
64 -
 65
65 -
 66
66 -
 67
67 -
 68
68 -
69
-
70
-
71
-
72
-
73
-
74
 |
 |
