HP LH4r HP Netserver LH 3000/3000r to LH 6000/6000r Upgrade Guide - Page 28
Cover for, Processor Slots, 2, and 3, Thumbscrew
 |
View all HP LH4r manuals
Add to My Manuals
Save this manual to your list of manuals |
Page 28 highlights
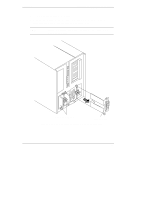
Chapter 4 Installing LH 6000/6000r Components 1. Loosen the thumbscrew and open the access cover to processor slots 1, 2, and 3. Processor slots 1 and 2 are empty, and slot 3 contains a terminator. Thumbscrew Cover for Processor Slots 1, 2, and 3 Figure 4-6. Open Cover for Processor Slots 1, 2, and 3 2. Remove the processor to be added from the sealed bag. 3. Open the latches on top of the processor module and align it with one of the open slots. In slots 1 and 2, the heat sink faces away from the system board. See Figure 4-7. 24
-
 1
1 -
2
-
3
-
4
-
5
-
6
-
7
-
8
-
9
-
10
-
11
-
12
-
13
-
14
-
15
-
16
-
17
-
18
-
19
-
20
-
21
-
22
-
 23
23 -
 24
24 -
 25
25 -
 26
26 -
 27
27 -
 28
28 -
 29
29 -
 30
30 -
 31
31 -
 32
32 -
 33
33 -
34
-
35
-
36
-
37
-
38
-
39
-
40
-
41
-
42
-
43
-
44
-
45
-
46
-
47
-
48
-
49
-
50
-
51
-
52
 |
 |

Chapter 4
Installing LH 6000/6000r Components
24
1.
Loosen the thumbscrew and open the access cover to processor slots 1, 2,
and 3.
Processor slots 1 and 2 are empty, and slot 3 contains a terminator.
Cover for
Processor Slots
1, 2, and 3
Thumbscrew
Figure 4-6. Open Cover for Processor Slots 1, 2, and 3
2.
Remove the processor to be added from the sealed bag.
3.
Open the latches on top of the processor module and align it with one of
the open slots. In slots 1 and 2, the heat sink faces away from the system
board. See Figure 4-7.