HP LH4r HP Netserver LH 3000/3000r to LH 6000/6000r Upgrade Guide - Page 35
Install Bezel Nameplate and Labels, Replace NetServer Covers
 |
View all HP LH4r manuals
Add to My Manuals
Save this manual to your list of manuals |
Page 35 highlights
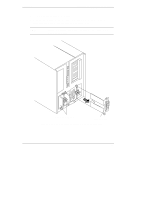
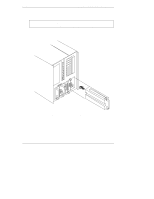
Chapter 4 Installing LH 6000/6000r Components Install Bezel Nameplate and Labels 1. Locate the appropriate nameplate for your NetServer's bezel. 2. Remove the old nameplate from your NetServer's bezel using a needle nose pliers. 3. Secure the new LH 6000 (or LH 6000r) nameplate to the bezel as follows: ◊ For the pedestal version (LH 6000), locate the short nameplate shipped with this upgrade kit and snap it into place. ◊ For a NetServer mounted in an HP systems rack, locate the long, thick nameplate. Bend the nameplate slightly and insert the tabs at either end of the nameplate into the slots in the bezel. Snap the nameplate into place. ◊ For a NetServer mounted in a Compaq rack, locate the long, thin nameplate. Insert the snap at one end of the nameplate, and then insert the other snaps successively. 4. Locate the "UPGRADED TO LH 6000" label shipped with this upgrade kit. 5. Apply the label just below the serial number on the back of the chassis. Replace NetServer Covers 1. Remove the old LH 3000/3000r Technical Reference Card from the pouch inside the chassis, and replace it with the new LH 6000/6000r Technical Reference Card. 2. Replace the NetServer covers. 3. If you have an HP NetServer LH 6000r in the rack orientation, slide the NetServer back into the rack chassis and secure it to the rack. 4. Install the additional power cord shipped with the Power Supply Upgrade Kit. This power cord connects to the cage that holds power supplies 3 and 4. NOTE The NetServer LH 6000/6000r will not power on unless you have three power supplies and two power cords. 5. Replace all power, telephone, and I/O cables you disconnected earlier. 31
-
 1
1 -
2
-
3
-
4
-
5
-
6
-
7
-
8
-
9
-
10
-
11
-
12
-
13
-
14
-
15
-
16
-
17
-
18
-
19
-
20
-
21
-
22
-
23
-
24
-
25
-
26
-
27
-
28
-
29
-
 30
30 -
 31
31 -
 32
32 -
 33
33 -
 34
34 -
 35
35 -
 36
36 -
 37
37 -
 38
38 -
 39
39 -
 40
40 -
41
-
42
-
43
-
44
-
45
-
46
-
47
-
48
-
49
-
50
-
51
-
52
 |
 |
