HP LH4r HP Netserver LH 3000/3000r to LH 6000/6000r Upgrade Guide - Page 31
Install New System Board
 |
View all HP LH4r manuals
Add to My Manuals
Save this manual to your list of manuals |
Page 31 highlights
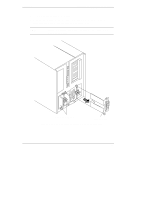
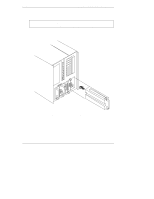
Chapter 4 Installing LH 6000/6000r Components Install New System Board When you have finished installing processors and DIMMs, you are ready to install the new system board. 1. Carefully reinsert the system board assembly into its guides. See Figures 4-9 and 4-10 for the correct orientation. 2. Rotate the blue latches to the flat, locked position to seat the system board securely in its socket. 3. Find the four thumbscrews shipped with this upgrade kit, and use them to secure the system board assembly to the chassis. Figure 4-9. Install New System Board in Pedestal Orientation 27
-
 1
1 -
2
-
3
-
4
-
5
-
6
-
7
-
8
-
9
-
10
-
11
-
12
-
13
-
14
-
15
-
16
-
17
-
18
-
19
-
20
-
21
-
22
-
23
-
24
-
25
-
 26
26 -
 27
27 -
 28
28 -
 29
29 -
 30
30 -
 31
31 -
 32
32 -
 33
33 -
 34
34 -
 35
35 -
 36
36 -
37
-
38
-
39
-
40
-
41
-
42
-
43
-
44
-
45
-
46
-
47
-
48
-
49
-
50
-
51
-
52
 |
 |

Chapter 4
Installing LH 6000/6000r Components
27
Install New System Board
When you have finished installing processors and DIMMs, you are ready to install
the new system board.
1.
Carefully reinsert the system board assembly into its guides. See Figures
4-9 and 4-10 for the correct orientation.
2.
Rotate the blue latches to the flat, locked position to seat the system board
securely in its socket.
3.
Find the four thumbscrews shipped with this upgrade kit, and use them to
secure the system board assembly to the chassis.
Figure 4-9. Install New System Board in Pedestal Orientation