HP LH4r HP Netserver LH 3000/3000r to LH 6000/6000r Upgrade Guide - Page 29
Close the access cover to the processor slots and tighten the thumbscrew
 |
View all HP LH4r manuals
Add to My Manuals
Save this manual to your list of manuals |
Page 29 highlights
Chapter 4 Installing LH 6000/6000r Components Figure 4-7. Open Processor Module Retaining Latches 4. Press the processor module into the slot until it is fully seated. 5. Rotate the retaining latches into the flat, closed position. 6. If you are adding more than two processors, be sure to install them in the order indicated in Figure 4-4. Remove terminators as necessary. 7. Close the access cover to the processor slots and tighten the thumbscrew (see Figure 4-6). 8. If you are adding more than two processor modules, install one VRM for each additional processor module as follows: 25
-
 1
1 -
2
-
3
-
4
-
5
-
6
-
7
-
8
-
9
-
10
-
11
-
12
-
13
-
14
-
15
-
16
-
17
-
18
-
19
-
20
-
21
-
22
-
23
-
 24
24 -
 25
25 -
 26
26 -
 27
27 -
 28
28 -
 29
29 -
 30
30 -
 31
31 -
 32
32 -
 33
33 -
 34
34 -
35
-
36
-
37
-
38
-
39
-
40
-
41
-
42
-
43
-
44
-
45
-
46
-
47
-
48
-
49
-
50
-
51
-
52
 |
 |

Chapter 4
Installing LH 6000/6000r Components
25
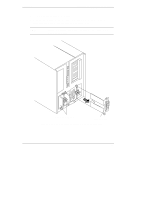
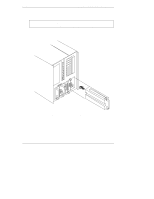
Figure 4-7. Open Processor Module Retaining Latches
4.
Press the processor module into the slot until it is fully seated.
5.
Rotate the retaining latches into the flat, closed position.
6.
If you are adding more than two processors, be sure to install them in the
order indicated in Figure 4-4. Remove terminators as necessary.
7.
Close the access cover to the processor slots and tighten the thumbscrew
(see Figure 4-6).
8. If you are adding more than two processor modules, install one VRM for
each additional processor module as follows: