HP LaserJet Pro CP1025 Service Manual - Page 45
Main assemblies, ITB assembly, Remove the ITB assembly
 |
View all HP LaserJet Pro CP1025 manuals
Add to My Manuals
Save this manual to your list of manuals |
Page 45 highlights
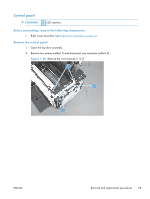
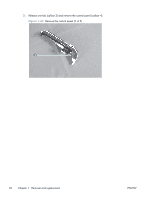
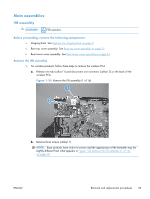
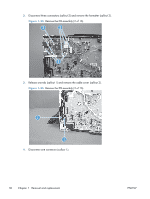
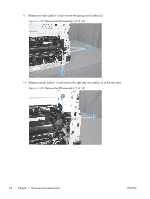
Main assemblies ITB assembly CAUTION: ESD sensitive. Before proceeding, remove the following components: ● Imaging drum. See Replace the imaging drum on page 9. ● Rear top cover assembly. See Rear top cover assembly on page 22. ● Rear lower cover assembly. See Rear lower cover assembly on page 24. Remove the ITB assembly 1. For wireless products, follow these steps to remove the wireless PCA. a. Release one tab (callout 1) and disconnect one connector (callout 2) on the back of the wireless PCA. Figure 1-24 Remove the ITB assembly (1 of 16) 1 2 b. Remove three screws (callout 1). NOTE: Base products have only two screws and the appearance of the formatter may be slightly different from what appears in Figure 1-24 Remove the ITB assembly (1 of 16) on page 29. ENWW Removal and replacement procedures 29
-
 1
1 -
2
-
3
-
4
-
5
-
6
-
7
-
8
-
9
-
10
-
11
-
12
-
13
-
14
-
15
-
16
-
17
-
18
-
19
-
20
-
21
-
22
-
23
-
24
-
25
-
26
-
27
-
28
-
29
-
30
-
31
-
32
-
33
-
34
-
35
-
36
-
37
-
38
-
39
-
 40
40 -
 41
41 -
 42
42 -
 43
43 -
 44
44 -
 45
45 -
 46
46 -
 47
47 -
 48
48 -
 49
49 -
 50
50 -
51
-
52
-
53
-
54
-
55
-
56
-
57
-
58
-
59
-
60
-
61
-
62
-
63
-
64
-
65
-
66
-
67
-
68
-
69
-
70
-
71
-
72
-
73
-
74
-
75
-
76
-
77
-
78
-
79
-
80
-
81
-
82
-
83
-
84
-
85
-
86
-
87
-
88
-
89
-
90
-
91
-
92
-
93
-
94
-
95
-
96
-
97
-
98
-
99
-
100
-
101
-
102
-
103
-
104
-
105
-
106
-
107
-
108
-
109
-
110
-
111
-
112
-
113
-
114
-
115
-
116
-
117
-
118
-
119
-
120
-
121
-
122
-
123
-
124
-
125
-
126
-
127
-
128
-
129
-
130
-
131
-
132
-
133
-
134
-
135
-
136
-
137
-
138
-
139
-
140
-
141
-
142
-
143
-
144
-
145
-
146
-
147
-
148
-
149
-
150
-
151
-
152
-
153
-
154
-
155
-
156
-
157
-
158
-
159
-
160
-
161
-
162
-
163
-
164
-
165
-
166
 |
 |