HP LaserJet Pro CP1025 Service Manual - Page 71
Step 5: Check the software, Step 6: Test print functionality, Step 7: Check the supplies
 |
View all HP LaserJet Pro CP1025 manuals
Add to My Manuals
Save this manual to your list of manuals |
Page 71 highlights
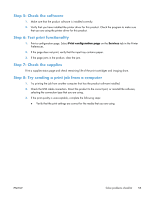
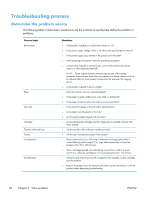
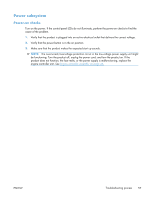
Step 5: Check the software 1. Make sure that the product software is installed correctly. 2. Verify that you have installed the printer driver for this product. Check the program to make sure that you are using the printer driver for this product. Step 6: Test print functionality 1. Print a configuration page. Select Print configuration page on the Services tab in the Printer Preferences. 2. If the page does not print, verify that the input tray contains paper. 3. If the page jams in the product, clear the jam. Step 7: Check the supplies Print a supplies status page and check remaining life of the print cartridges and imaging drum. Step 8: Try sending a print job from a computer 1. Try printing the job from another computer that has the product software installed. 2. Check the USB cable connection. Direct the product to the correct port, or reinstall the software, selecting the connection type that you are using. 3. If the print quality is unacceptable, complete the following steps: ● Verify that the print settings are correct for the media that you are using. ENWW Solve problems checklist 55
-
 1
1 -
2
-
3
-
4
-
5
-
6
-
7
-
8
-
9
-
10
-
11
-
12
-
13
-
14
-
15
-
16
-
17
-
18
-
19
-
20
-
21
-
22
-
23
-
24
-
25
-
26
-
27
-
28
-
29
-
30
-
31
-
32
-
33
-
34
-
35
-
36
-
37
-
38
-
39
-
40
-
41
-
42
-
43
-
44
-
45
-
46
-
47
-
48
-
49
-
50
-
51
-
52
-
53
-
54
-
55
-
56
-
57
-
58
-
59
-
60
-
61
-
62
-
63
-
64
-
65
-
 66
66 -
 67
67 -
 68
68 -
 69
69 -
 70
70 -
 71
71 -
 72
72 -
 73
73 -
 74
74 -
 75
75 -
 76
76 -
77
-
78
-
79
-
80
-
81
-
82
-
83
-
84
-
85
-
86
-
87
-
88
-
89
-
90
-
91
-
92
-
93
-
94
-
95
-
96
-
97
-
98
-
99
-
100
-
101
-
102
-
103
-
104
-
105
-
106
-
107
-
108
-
109
-
110
-
111
-
112
-
113
-
114
-
115
-
116
-
117
-
118
-
119
-
120
-
121
-
122
-
123
-
124
-
125
-
126
-
127
-
128
-
129
-
130
-
131
-
132
-
133
-
134
-
135
-
136
-
137
-
138
-
139
-
140
-
141
-
142
-
143
-
144
-
145
-
146
-
147
-
148
-
149
-
150
-
151
-
152
-
153
-
154
-
155
-
156
-
157
-
158
-
159
-
160
-
161
-
162
-
163
-
164
-
165
-
166
 |
 |