HP LaserJet Pro CP1025 Service Manual - Page 99
Solve image-quality problems, Image defects table
 |
View all HP LaserJet Pro CP1025 manuals
Add to My Manuals
Save this manual to your list of manuals |
Page 99 highlights
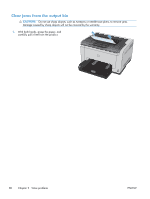
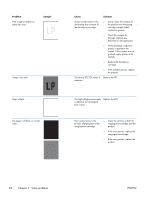
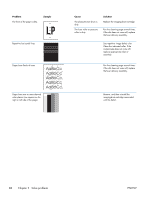
Solve image-quality problems This section helps you define print-quality problems and what to do to correct them. Often print-quality problems can be handled easily by making sure that the product is maintained, using paper that meets HP specifications, or running a cleaning page. Image defects table The following examples illustrate problems that would affect all the pages that you print, whether you print in color or in black only. The topics that follow list the typical cause and solution for each of these examples. Problem Print is light or faded on entire page. Sample Cause Solution Poor contact exist between the ● ITB and the product ground contacts. Clean the grounding contacts. If the problem remains after cleaning, check the contacts for damage. Replace any deformed or damaged parts. ● Replace the ITB. ● If the problem persists, replace the product. Poor contact exists in the T1 bias and the ITB. ● Clean the contacts. If the problem remains after cleaning, check the contacts for damage. Replace any deformed or damaged parts. ● Replace the ITB. ● If the problem persists, replace the product. Poor contact with the secondary transfer roller. ● Clean the contacts (product and secondary transfer roller). If the problem remains after cleaning, check the contacts for damage. Replace any deformed or damaged parts. ● If the problem persists, replace the rear door assembly. ENWW Solve image-quality problems 83
-
 1
1 -
2
-
3
-
4
-
5
-
6
-
7
-
8
-
9
-
10
-
11
-
12
-
13
-
14
-
15
-
16
-
17
-
18
-
19
-
20
-
21
-
22
-
23
-
24
-
25
-
26
-
27
-
28
-
29
-
30
-
31
-
32
-
33
-
34
-
35
-
36
-
37
-
38
-
39
-
40
-
41
-
42
-
43
-
44
-
45
-
46
-
47
-
48
-
49
-
50
-
51
-
52
-
53
-
54
-
55
-
56
-
57
-
58
-
59
-
60
-
61
-
62
-
63
-
64
-
65
-
66
-
67
-
68
-
69
-
70
-
71
-
72
-
73
-
74
-
75
-
76
-
77
-
78
-
79
-
80
-
81
-
82
-
83
-
84
-
85
-
86
-
87
-
88
-
89
-
90
-
91
-
92
-
93
-
 94
94 -
 95
95 -
 96
96 -
 97
97 -
 98
98 -
 99
99 -
 100
100 -
 101
101 -
 102
102 -
 103
103 -
 104
104 -
105
-
106
-
107
-
108
-
109
-
110
-
111
-
112
-
113
-
114
-
115
-
116
-
117
-
118
-
119
-
120
-
121
-
122
-
123
-
124
-
125
-
126
-
127
-
128
-
129
-
130
-
131
-
132
-
133
-
134
-
135
-
136
-
137
-
138
-
139
-
140
-
141
-
142
-
143
-
144
-
145
-
146
-
147
-
148
-
149
-
150
-
151
-
152
-
153
-
154
-
155
-
156
-
157
-
158
-
159
-
160
-
161
-
162
-
163
-
164
-
165
-
166
 |
 |