HP LaserJet Pro CP1025 Service Manual - Page 74
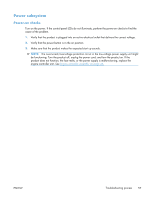
Tools for troubleshooting, Component diagnostics, Engine diagnostics, Engine test
 |
View all HP LaserJet Pro CP1025 manuals
Add to My Manuals
Save this manual to your list of manuals |
Page 74 highlights
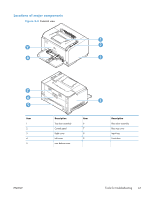
Tools for troubleshooting Component diagnostics Engine diagnostics Printing an engine test page helps determine if the product engine is functioning. Use the following procedure to print a test page to make sure that the product engine is functioning Engine test page NOTE: The product does not have a test-print switch. 1. When the product is in the Ready state, press and hold the Auto-On/Auto-Off (power) button for about seven seconds or until the Ready light turns off. TIP: Optionally, unplug the power cord, and then plug the cord back in. 2. Make sure that at least one sheet of paper is loaded in the input tray. 3. Open the top door (print-cartridge door). 4. Release the rear door and allow it to open to its first stop position; open about 19 mm (.75 in). 5. Press and hold the Auto-On/Auto-Off (power) button. NOTE: The control-panel lights cycle on and off sequentially twice, starting with the blackcartridge light (top) and ending with the Ready light. 6. When the black-cartridge light turns on for the second time-the beginning of the second cycle- close the rear door, and then within five seconds close the top door (print-cartridge door). 7. When the product finishes initializing, an engine test page prints. Figure 2-1 Engine test page 58 Chapter 2 Solve problems ENWW
-
 1
1 -
2
-
3
-
4
-
5
-
6
-
7
-
8
-
9
-
10
-
11
-
12
-
13
-
14
-
15
-
16
-
17
-
18
-
19
-
20
-
21
-
22
-
23
-
24
-
25
-
26
-
27
-
28
-
29
-
30
-
31
-
32
-
33
-
34
-
35
-
36
-
37
-
38
-
39
-
40
-
41
-
42
-
43
-
44
-
45
-
46
-
47
-
48
-
49
-
50
-
51
-
52
-
53
-
54
-
55
-
56
-
57
-
58
-
59
-
60
-
61
-
62
-
63
-
64
-
65
-
66
-
67
-
68
-
 69
69 -
 70
70 -
 71
71 -
 72
72 -
 73
73 -
 74
74 -
 75
75 -
 76
76 -
 77
77 -
 78
78 -
 79
79 -
80
-
81
-
82
-
83
-
84
-
85
-
86
-
87
-
88
-
89
-
90
-
91
-
92
-
93
-
94
-
95
-
96
-
97
-
98
-
99
-
100
-
101
-
102
-
103
-
104
-
105
-
106
-
107
-
108
-
109
-
110
-
111
-
112
-
113
-
114
-
115
-
116
-
117
-
118
-
119
-
120
-
121
-
122
-
123
-
124
-
125
-
126
-
127
-
128
-
129
-
130
-
131
-
132
-
133
-
134
-
135
-
136
-
137
-
138
-
139
-
140
-
141
-
142
-
143
-
144
-
145
-
146
-
147
-
148
-
149
-
150
-
151
-
152
-
153
-
154
-
155
-
156
-
157
-
158
-
159
-
160
-
161
-
162
-
163
-
164
-
165
-
166
 |
 |