HP Mini 311-1028TU Notebook Essentials - Windows XP
HP Mini 311-1028TU Manual
 |
View all HP Mini 311-1028TU manuals
Add to My Manuals
Save this manual to your list of manuals |
HP Mini 311-1028TU manual content summary:
- HP Mini 311-1028TU | Notebook Essentials - Windows XP - Page 1
electronic manuals 2 Finding more information 3 Chapter 2: Using HP QuickWeb (select models only) Setting up HP HP Wireless Assistant software (select models only 14 Connecting to an existing wireless network 14 Setting up a new wireless network 15 Step 1: Purchase high-speed Internet service - HP Mini 311-1028TU | Notebook Essentials - Windows XP - Page 2
A: Routine care Cleaning the display 29 Cleaning the TouchPad and keyboard 29 Traveling and shipping 29 Appendix B: Problem meets solution Troubleshooting resources 31 Quick troubleshooting 31 The computer is unable to start up 31 The computer screen is blank 31 Software is functioning - HP Mini 311-1028TU | Notebook Essentials - Windows XP - Page 3
do and where to find additional information. For example, this guide provides specific instructions for connecting to wired and wireless networks. You will also find computer, refer to the user guide. Click Start, click Help and Support, and then click User Guides. Getting to know your computer The - HP Mini 311-1028TU | Notebook Essentials - Windows XP - Page 4
computer's defenses with Windows Security Center. HP also recommends that you always update manuals For detailed information about your computer, such as information about power management, drives, memory, security, and other features, click Start, click Help and Support, and then click User Guides - HP Mini 311-1028TU | Notebook Essentials - Windows XP - Page 5
system, drivers, troubleshooting tools, and technical support. To access Help and Support, click Start, and then click Help and Support. For country- or region-specific support, go to http://www.hp.com/support, select your country or region, and follow the on-screen instructions. Å WARNING: To - HP Mini 311-1028TU | Notebook Essentials - Windows XP - Page 6
574395-002.book Page 4 Sunday, September 20, 2009 11:32 AM - HP Mini 311-1028TU | Notebook Essentials - Windows XP - Page 7
574395-002.book Page 5 Sunday, September 20, 2009 11:32 AM Chapter 2: Using HP QuickWeb (select models only) HP QuickWeb is an optional, instant-on environment that is separate from your Windows operating system. QuickWeb allows you to rapidly access a Web browser, and other - HP Mini 311-1028TU | Notebook Essentials - Windows XP - Page 8
20, 2009 11:32 AM Chapter 2: Using HP QuickWeb (select models only) Setting up HP QuickWeb for the first time The first time you turn on your computer after completing the Windows setup process, the QuickWeb setup screens appear. Follow the on-screen instructions to activate QuickWeb. At the end of - HP Mini 311-1028TU | Notebook Essentials - Windows XP - Page 9
start Microsoft® Windows®, you must click the Windows Start icon in the QuickWeb Home screen. To start Microsoft Windows: 1. Turn on your computer. The HP QuickWeb Home screen appears. 2. Click the Windows Start icon on the far left of the QuickWeb Home screen. 3. A dialog box appears, asking if you - HP Mini 311-1028TU | Notebook Essentials - Windows XP - Page 10
Sunday, September 20, 2009 11:32 AM Chapter 2: Using HP QuickWeb (select models only) Icon Description Launches Skype (select models hard drive or external drives. Supports .mp3 files. Launches Photo Viewer. Browse photos stored on your hard drive or external drive. Supports .bmp, .gif, .jpg, - HP Mini 311-1028TU | Notebook Essentials - Windows XP - Page 11
11:32 AM Chapter 2: Using HP QuickWeb (select models only) Icon Description Controls power settings: ■ When the computer is connected to AC power, the icon appears with an AC power cord. ■ When the computer is running on battery power, the icon appears as only a battery. The state of charge is - HP Mini 311-1028TU | Notebook Essentials - Windows XP - Page 12
then select the Enable Wi-Fi check box. For more information on setting up a wireless connection using HP QuickWeb and Windows, refer to Chapter 3, "Connecting to the Internet," and to the HP QuickWeb software Help. Playing music To play music: 1. Click the Music icon on the LaunchBar. Music Player - HP Mini 311-1028TU | Notebook Essentials - Windows XP - Page 13
the terms and possible charges you can incur from using Skype. ✎ For more information on using Skype, refer to the software Help. Disabling and enabling HP QuickWeb To disable or reenable QuickWeb from within the Windows operating system: 1. Click Start, click All Programs, and then click - HP Mini 311-1028TU | Notebook Essentials - Windows XP - Page 14
574395-002.book Page 12 Sunday, September 20, 2009 11:32 AM - HP Mini 311-1028TU | Notebook Essentials - Windows XP - Page 15
by your ISP. Choosing an ISP You must set up Internet service before you can connect to the Internet. The computer includes the settings. To access the Windows New Connection Wizard and instructions for using it, click Start, click Help and Support, and then click Start the New Connection Wizard. - HP Mini 311-1028TU | Notebook Essentials - Windows XP - Page 16
only) Connection Manager allows you to manage your Internet profiles, SMS (Short Message Service) messaging, connection devices and methods, and edit additional settings. To start Connection Manager, click the HP Connection Manager icon in the notification area, at the far right of the taskbar - HP Mini 311-1028TU | Notebook Essentials - Windows XP - Page 17
cable modem. The ISP will help set up the modem, install a network cable to connect your wireless device to the modem, and test the Internet service. 2. Your ISP will give you a User ID and password to access the Internet. Record this information and store it in a safe place. Notebook Essentials - HP Mini 311-1028TU | Notebook Essentials - Windows XP - Page 18
then click Create a new connection. 3. Follow the on-screen instructions. Step 3: Configure the computer to connect to the wireless network the wireless function by pressing the wireless button. Refer to the user guide in Help and Support if you need help locating the wireless button or light. 3. - HP Mini 311-1028TU | Notebook Essentials - Windows XP - Page 19
574395-002.book Page 17 Sunday, September 20, 2009 11:32 AM Chapter 3: Connecting to the Internet Connecting to a wired network Connecting to a wired network requires an RJ-45 network cable (purchased separately). If the cable contains noise suppression circuitry 1, which prevents interference from - HP Mini 311-1028TU | Notebook Essentials - Windows XP - Page 20
574395-002.book Page 18 Sunday, September 20, 2009 11:32 AM - HP Mini 311-1028TU | Notebook Essentials - Windows XP - Page 21
taskbar, and icon shortcuts that are used to start programs. Icon name Norton Internet Security HP Wireless Assistant (select models only) Network status Wireless network status (2 icons) HP Connection Manager (select models only) Alps Pointing Devices Description Displays the status of the Norton - HP Mini 311-1028TU | Notebook Essentials - Windows XP - Page 22
To access links for updating installed software, refer to Help and Support. Installing software from the Internet To install software from the Internet, go to the software manufacturer's Web site and follow the instructions. Ä CAUTION: Software downloaded from the Internet may contain viruses. Refer - HP Mini 311-1028TU | Notebook Essentials - Windows XP - Page 23
CD-RWs, use a CD-R to burn music CDs. ■ DVD players used in home systems usually do not support all DVD formats. Refer to the manufacturer's instructions that came with your DVD player for a list of supported formats. ■ An .mp3 file uses less disc space than other music file formats, and the process - HP Mini 311-1028TU | Notebook Essentials - Windows XP - Page 24
574395-002.book Page 22 Sunday, September 20, 2009 11:32 AM - HP Mini 311-1028TU | Notebook Essentials - Windows XP - Page 25
you protect the computer against new viruses beyond 60 days by purchasing extended update service. Instructions for using and updating Norton Internet Security software and for purchasing extended update service are provided within the program. ■ To access Norton Internet Security, or to get more - HP Mini 311-1028TU | Notebook Essentials - Windows XP - Page 26
Standard for Safety of Information Technology Equipment (IEC 60950). Å WARNING: To reduce potential safety issues, use only the AC adapter or battery provided with the computer, a replacement AC adapter or battery provided by HP, or a compatible AC adapter or battery purchased as an accessory from - HP Mini 311-1028TU | Notebook Essentials - Windows XP - Page 27
information, perform a search for these topics in Help and Support. Backing up your information Successful recovery after a system failure cannot use your computer to access the Disaster Recovery utility. Therefore, HP recommends that you download the Disaster Recovery utility SoftPaq, and then - HP Mini 311-1028TU | Notebook Essentials - Windows XP - Page 28
screen. 8. Follow the on-screen instructions. Performing a recovery In case of system state if a software-related problem occurs. The Instant Restore utility saving the current computer state manually. ✎ For more information Disaster Recovery is available from the HP Web site in a compressed file - HP Mini 311-1028TU | Notebook Essentials - Windows XP - Page 29
information, click How do I find my product name/number. 4. Click HP Mini 311, and then click Microsoft XP. 5. Select the SoftPaq for the Back on Track Disaster Recovery boot utility, and then follow the on-screen instructions. 6. When prompted, click Save, and then select the computer hard drive - HP Mini 311-1028TU | Notebook Essentials - Windows XP - Page 30
stopped responding and the computer screen is blue, restart the computer by turning the power button off and then on. 2. When the computer logo (HP or Compaq) is displayed on the screen, press the f6 button repeatedly until the Windows status bar is displayed. 3. When the Roxio BackOnTrack screen - HP Mini 311-1028TU | Notebook Essentials - Windows XP - Page 31
574395-002.book Page 29 Sunday, September 20, 2009 11:32 AM Appendix A: Routine care Cleaning the display Ä CAUTION: To prevent permanent damage to the computer, never spray water, cleaning fluids, or chemicals on the display. To remove smudges and lint, frequently clean the display with a soft, - HP Mini 311-1028TU | Notebook Essentials - Windows XP - Page 32
be unused and disconnected from external power for more than 2 weeks, remove the battery pack and store it separately. ■ If you are shipping the computer or a Global System for Mobile Communications (GSM), or a General Packet Radio Service (GPRS) device, the use of these devices may be restricted in - HP Mini 311-1028TU | Notebook Essentials - Windows XP - Page 33
problem is resolved: ■ Refer to "Quick troubleshooting," the next section in this chapter. ■ Access Web site links and additional information about the computer through Help and Support. Click Start, and then click Help and Support by HP for this computer. ■ If the computer is running on battery - HP Mini 311-1028TU | Notebook Essentials - Windows XP - Page 34
32 AM Appendix B: Problem meets solution Software is For additional information, refer to the software manufacturer's instructions, which may be provided with the software, on 2. Disconnect the computer from external power and remove the battery. The computer is unusually warm It is normal for the - HP Mini 311-1028TU | Notebook Essentials - Windows XP - Page 35
20, 2009 11:32 AM Appendix B: Problem meets solution ■ Be sure that the links in Help and Support. ✎ For information on activating mobile broadband service (select models only), Go to http://www.hp.com/support, select your country or region, and then follow the on-screen instructions. If you have an - HP Mini 311-1028TU | Notebook Essentials - Windows XP - Page 36
574395-002.book Page 34 Sunday, September 20, 2009 11:32 AM Appendix B: Problem meets solution 6. Click OK, and then click OK again. 7. Insert the printer driver installation CD and follow the on-screen instructions. When the printer driver installation is finished, follow these steps to reset the - HP Mini 311-1028TU | Notebook Essentials - Windows XP - Page 37
be powered from a standalone DC power source, it should be powered only with an AC adapter or a DC power source supplied and approved by HP for use with this computer. The computer is capable of accepting DC power within the following specifications. Input power Rating Operating voltage 18.5 Vdc - HP Mini 311-1028TU | Notebook Essentials - Windows XP - Page 38
574395-002.book Page 36 Sunday, September 20, 2009 11:32 AM - HP Mini 311-1028TU | Notebook Essentials - Windows XP - Page 39
firewall 13, 24 H Help and Support 33 HP Connection Manager software, using 14 HP Wireless Assistant software, using 14 problems 32 overheating, computer 32 P personal files, protecting 23 Photo Viewer 5 power 35 power specifications 35 power surges 24 printer driver installation, troubleshooting - HP Mini 311-1028TU | Notebook Essentials - Windows XP - Page 40
29 traveling 29 traveling with the computer 29 38 troubleshooting blank screen 31 display problems 31 overheating problems 32 startup problems 31 virus problems 32 turning on the computer 31 U unresponsive computer, troubleshooting 32 user guides 2 V vents, precautions 32 viruses 23 W Web browser
-
 1
1 -
 2
2 -
 3
3 -
 4
4 -
 5
5 -
 6
6 -
 7
7 -
8
-
9
-
10
-
11
-
12
-
13
-
14
-
15
-
16
-
17
-
18
-
19
-
20
-
21
-
22
-
23
-
24
-
25
-
26
-
27
-
28
-
29
-
30
-
31
-
32
-
33
-
34
-
35
-
36
-
37
-
38
-
39
-
40
 |
 |

Notebook Essentials
iii
Contents
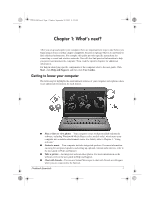
Chapter 1: What’s next?
Getting to know your computer . . . . . . . . . . . . . . . . . . . . . . . . . . . . . . . . . . . . . . . . . . . . . 1
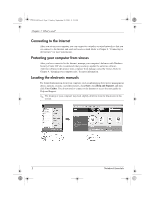
Connecting to the Internet. . . . . . . . . . . . . . . . . . . . . . . . . . . . . . . . . . . . . . . . . . . . . . . . . . 2
Protecting your computer from viruses . . . . . . . . . . . . . . . . . . . . . . . . . . . . . . . . . . . . . . . 2
Locating the electronic manuals . . . . . . . . . . . . . . . . . . . . . . . . . . . . . . . . . . . . . . . . . . . . . 2
Finding more information. . . . . . . . . . . . . . . . . . . . . . . . . . . . . . . . . . . . . . . . . . . . . . . . . . 3
Chapter 2: Using HP QuickWeb (select models only)
Setting up HP QuickWeb for the first time. . . . . . . . . . . . . . . . . . . . . . . . . . . . . . . . . . . . . 6
Starting Microsoft Windows. . . . . . . . . . . . . . . . . . . . . . . . . . . . . . . . . . . . . . . . . . . . . . . . 7
Identifying the QuickWeb control buttons . . . . . . . . . . . . . . . . . . . . . . . . . . . . . . . . . . . . . 7
Identifying the LaunchBar icons. . . . . . . . . . . . . . . . . . . . . . . . . . . . . . . . . . . . . . . . . 7
Identifying the notification icons . . . . . . . . . . . . . . . . . . . . . . . . . . . . . . . . . . . . . . . . 8
Using the Settings panel . . . . . . . . . . . . . . . . . . . . . . . . . . . . . . . . . . . . . . . . . . . . . . . . . . . 9
Configuring the network. . . . . . . . . . . . . . . . . . . . . . . . . . . . . . . . . . . . . . . . . . . . . . . . . . 10
Playing music . . . . . . . . . . . . . . . . . . . . . . . . . . . . . . . . . . . . . . . . . . . . . . . . . . . . . . . . . . 10
Browsing photos . . . . . . . . . . . . . . . . . . . . . . . . . . . . . . . . . . . . . . . . . . . . . . . . . . . . . . . . 10
Creating instant messages with Chat . . . . . . . . . . . . . . . . . . . . . . . . . . . . . . . . . . . . . . . . 11
Making Internet phone calls with Skype (select models only) . . . . . . . . . . . . . . . . . . . . . 11
Disabling and enabling HP QuickWeb. . . . . . . . . . . . . . . . . . . . . . . . . . . . . . . . . . . . . . . 11
Chapter 3: Connecting to the Internet
Choosing the type of Internet access . . . . . . . . . . . . . . . . . . . . . . . . . . . . . . . . . . . . . . . . 13
Choosing an ISP . . . . . . . . . . . . . . . . . . . . . . . . . . . . . . . . . . . . . . . . . . . . . . . . . . . . . . . . 13
Using the Windows New Connection Wizard . . . . . . . . . . . . . . . . . . . . . . . . . . . . . . . . . 13
Using HP Connection Manager software (select models only) . . . . . . . . . . . . . . . . . . . . 14
Using HP Wireless Assistant software (select models only) . . . . . . . . . . . . . . . . . . . . . . 14
Connecting to an existing wireless network . . . . . . . . . . . . . . . . . . . . . . . . . . . . . . . . . . . 14
Setting up a new wireless network . . . . . . . . . . . . . . . . . . . . . . . . . . . . . . . . . . . . . . . . . . 15
Step 1: Purchase high-speed Internet service . . . . . . . . . . . . . . . . . . . . . . . . . . . . . . 15
Step 2: Purchase and install a wireless router. . . . . . . . . . . . . . . . . . . . . . . . . . . . . . 16
Step 3: Configure the computer to connect to the wireless network . . . . . . . . . . . . 16
Connecting to a wired network. . . . . . . . . . . . . . . . . . . . . . . . . . . . . . . . . . . . . . . . . . . . . 17
Chapter 4: Using software
Identifying the Windows desktop shortcuts . . . . . . . . . . . . . . . . . . . . . . . . . . . . . . . . . . . 19
Identifying the software on the computer. . . . . . . . . . . . . . . . . . . . . . . . . . . . . . . . . . . . . 20
Updating the software installed on the computer . . . . . . . . . . . . . . . . . . . . . . . . . . . . . . . 20
Installing software from the Internet . . . . . . . . . . . . . . . . . . . . . . . . . . . . . . . . . . . . . . . . 20
Installing software from a CD or DVD (select models only). . . . . . . . . . . . . . . . . . . . . . 20
Creating (burning) a CD or DVD (select models only) . . . . . . . . . . . . . . . . . . . . . . . . . . 21
574395-002.book
Page iii
Sunday, September 20, 2009
11:32 AM