HP Officejet 600 HP OfficeJet 600 Series All-in-One - (English) User Guide - Page 87
Scanning from TWAIN-compliant, software
 |
View all HP Officejet 600 manuals
Add to My Manuals
Save this manual to your list of manuals |
Page 87 highlights
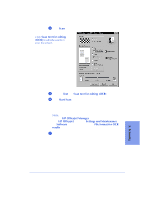
Scanning from TWAIN-compliant software Some software programs use an industry standard called TWAIN to allow images to be acquired directly from scanners. This eliminates some steps from the scanning procedure. How to tell if your software program supports TWAIN To find out if your application uses this method: q Locate Acquire or Acquire Image under the File menu. q Check the software's documentation. If you can't find any references to TWAIN, your program doesn't support it. How to scan with TWAIN Note: If your software program does not support TWAIN, the following procedure will not work. 1 Make sure your software program has the HP OfficeJet Series 600 selected as the scanning source. Usually, you can check this by choosing Select Source or Acquire/Select Source from the File menu in your software. If you can't find where to select the scanning source in your software program, check the program's documentation. 2 Open a document in your software where you want the image to be placed. 3 Load your image or document in the document tray with the printed side facing away from you (as many pages as your software will allow, or a single scan/copy sleeve). Note: If the Document Assistant displays, close it. 4 Select Acquire Image from the File menu in your software. (Some programs may have a slightly different command, like Acquire.) If the Scan Settings dialog box displays, choose from the many scanning options, or click Help for information about the options. Some applications scan using their own settings. In this case the Scan Settings dialog box won't be displayed. The scanned image will appear in the Image Viewer. You can edit your image using the Image Viewer tools - see "Scan Image Viewer" on page 5-5. When you exit from the Image Viewer, the edited image will appear in your application. 5-7 5. Scanning
-
 1
1 -
2
-
3
-
4
-
5
-
6
-
7
-
8
-
9
-
10
-
11
-
12
-
13
-
14
-
15
-
16
-
17
-
18
-
19
-
20
-
21
-
22
-
23
-
24
-
25
-
26
-
27
-
28
-
29
-
30
-
31
-
32
-
33
-
34
-
35
-
36
-
37
-
38
-
39
-
40
-
41
-
42
-
43
-
44
-
45
-
46
-
47
-
48
-
49
-
50
-
51
-
52
-
53
-
54
-
55
-
56
-
57
-
58
-
59
-
60
-
61
-
62
-
63
-
64
-
65
-
66
-
67
-
68
-
69
-
70
-
71
-
72
-
73
-
74
-
75
-
76
-
77
-
78
-
79
-
80
-
81
-
 82
82 -
 83
83 -
 84
84 -
 85
85 -
 86
86 -
 87
87 -
 88
88 -
 89
89 -
 90
90 -
 91
91 -
 92
92 -
93
-
94
-
95
-
96
-
97
-
98
-
99
-
100
-
101
-
102
-
103
-
104
-
105
-
106
-
107
-
108
-
109
-
110
-
111
-
112
-
113
-
114
-
115
-
116
-
117
-
118
-
119
-
120
-
121
-
122
-
123
-
124
-
125
-
126
-
127
-
128
-
129
-
130
-
131
-
132
-
133
-
134
-
135
-
136
-
137
-
138
-
139
-
140
 |
 |