HP Officejet Pro 276dw HP Officejet Pro 276dw - User Guide - Page 109
Placement of the text or graphics is wrong, Print quality troubleshooting
 |
View all HP Officejet Pro 276dw manuals
Add to My Manuals
Save this manual to your list of manuals |
Page 109 highlights
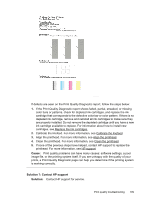
Check the printer location and length of USB cable High electromagnetic fields (such as those generated by USB cables) can sometimes cause slight distortions to printouts. Move the printer away from the source of the electromagnetic fields. Also, it is recommended that you use a USB cable that is less than 3 meters (9.8 feet) long to minimize the effects of these electromagnetic fields. Placement of the text or graphics is wrong Check how the media is loaded Make sure the media width and length guides fit snugly against the edges of the stack of media, and make sure the tray is not overloaded. For more information, see Load paper. Check the media size • Content on a page might be cut off if the document size is larger than the media that you are using. • Make sure the media size selected in the printer driver match the size of media loaded in the tray. Check the margin settings If the text or graphics are cut off at the edges of the page, make sure the margin settings for the document do not exceed the printable area of your printer. For more information, see Set minimum margins. Check the page-orientation setting Make sure the media size and page orientation selected in the application match the settings in the printer driver. For more information, see Print. Check the printer location and length of USB cable High electromagnetic fields (such as those generated by USB cables) can sometimes cause slight distortions to printouts. Move the printer away from the source of the electromagnetic fields. Also, it is recommended that you use a USB cable that is less than 3 meters (9.8 feet) long to minimize the effects of these electromagnetic fields. If the above solutions do not work, the problem may be caused by the inability of the application to interpret print settings correctly. See the release notes for known software conflicts, refer to the application's documentation, or contact the software manufacturer for specific help. Print quality troubleshooting Try the solutions in this section to resolve print quality problems in your printout. TIP: You can visit the HP online support website at www.hp.com/support for information and utilities that can help you correct many common printer problems. • Solution 1: Make sure you are using genuine HP ink cartridges • Solution 2: Check the ink levels Print quality troubleshooting 105
-
 1
1 -
2
-
3
-
4
-
5
-
6
-
7
-
8
-
9
-
10
-
11
-
12
-
13
-
14
-
15
-
16
-
17
-
18
-
19
-
20
-
21
-
22
-
23
-
24
-
25
-
26
-
27
-
28
-
29
-
30
-
31
-
32
-
33
-
34
-
35
-
36
-
37
-
38
-
39
-
40
-
41
-
42
-
43
-
44
-
45
-
46
-
47
-
48
-
49
-
50
-
51
-
52
-
53
-
54
-
55
-
56
-
57
-
58
-
59
-
60
-
61
-
62
-
63
-
64
-
65
-
66
-
67
-
68
-
69
-
70
-
71
-
72
-
73
-
74
-
75
-
76
-
77
-
78
-
79
-
80
-
81
-
82
-
83
-
84
-
85
-
86
-
87
-
88
-
89
-
90
-
91
-
92
-
93
-
94
-
95
-
96
-
97
-
98
-
99
-
100
-
101
-
102
-
103
-
 104
104 -
 105
105 -
 106
106 -
 107
107 -
 108
108 -
 109
109 -
 110
110 -
 111
111 -
 112
112 -
 113
113 -
 114
114 -
115
-
116
-
117
-
118
-
119
-
120
-
121
-
122
-
123
-
124
-
125
-
126
-
127
-
128
-
129
-
130
-
131
-
132
-
133
-
134
-
135
-
136
-
137
-
138
-
139
-
140
-
141
-
142
-
143
-
144
-
145
-
146
-
147
-
148
-
149
-
150
-
151
-
152
-
153
-
154
-
155
-
156
-
157
-
158
-
159
-
160
-
161
-
162
-
163
-
164
-
165
-
166
-
167
-
168
-
169
-
170
-
171
-
172
-
173
-
174
-
175
-
176
-
177
-
178
-
179
-
180
-
181
-
182
-
183
-
184
-
185
-
186
-
187
-
188
-
189
-
190
-
191
-
192
-
193
-
194
-
195
-
196
-
197
-
198
-
199
-
200
-
201
-
202
-
203
-
204
-
205
-
206
-
207
-
208
-
209
-
210
-
211
-
212
-
213
-
214
-
215
-
216
-
217
-
218
-
219
-
220
-
221
-
222
-
223
-
224
-
225
-
226
-
227
-
228
-
229
-
230
-
231
-
232
-
233
-
234
-
235
-
236
-
237
-
238
-
239
-
240
-
241
-
242
-
243
-
244
-
245
-
246
-
247
-
248
-
249
-
250
-
251
-
252
-
253
-
254
-
255
-
256
-
257
-
258
-
259
-
260
 |
 |