HP Officejet Pro 276dw HP Officejet Pro 276dw - User Guide - Page 31
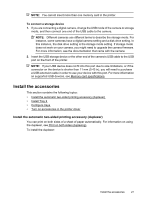
Install the accessories, Install the automatic two-sided printing accessory (duplexer)
 |
View all HP Officejet Pro 276dw manuals
Add to My Manuals
Save this manual to your list of manuals |
Page 31 highlights
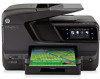
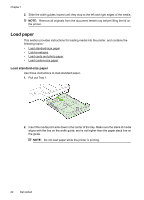
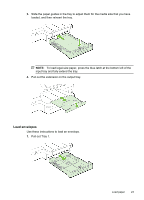
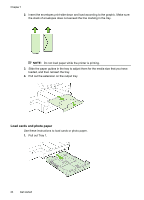
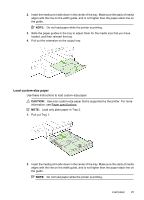
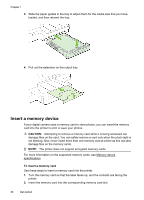
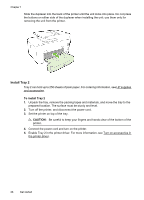
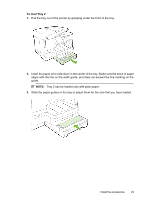
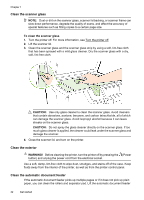
NOTE: You cannot insert more than one memory card in the printer. To connect a storage device 1. If you are connecting a digital camera, change the USB mode of the camera to storage mode, and then connect one end of the USB cable to the camera. NOTE: Different cameras use different terms to describe the storage mode. For instance, some cameras have a digital camera setting and a disk drive setting. In this instance, the disk drive setting is the storage mode setting. If storage mode does not work on your camera, you might need to upgrade the camera firmware. For more information, see the documentation that came with the camera. 2. Insert the USB storage device or the other end of the camera's USB cable to the USB port on the front of the printer. NOTE: If your USB device does not fit into this port due to size limitations, or if the connector on the device is shorter than 11 mm (0.43 in), you will need to purchase a USB extension cable in order to use your device with this port. For more information on supported USB devices, see Memory card specifications. Install the accessories This section contains the following topics: • Install the automatic two-sided printing accessory (duplexer) • Install Tray 2 • Configure trays • Turn on accessories in the printer driver Install the automatic two-sided printing accessory (duplexer) You can print on both sides of a sheet of paper automatically. For information on using the duplexer, see Print on both sides (duplexing). To install the duplexer: Install the accessories 27
-
 1
1 -
2
-
3
-
4
-
5
-
6
-
7
-
8
-
9
-
10
-
11
-
12
-
13
-
14
-
15
-
16
-
17
-
18
-
19
-
20
-
21
-
22
-
23
-
24
-
25
-
 26
26 -
 27
27 -
 28
28 -
 29
29 -
 30
30 -
 31
31 -
 32
32 -
 33
33 -
 34
34 -
 35
35 -
 36
36 -
37
-
38
-
39
-
40
-
41
-
42
-
43
-
44
-
45
-
46
-
47
-
48
-
49
-
50
-
51
-
52
-
53
-
54
-
55
-
56
-
57
-
58
-
59
-
60
-
61
-
62
-
63
-
64
-
65
-
66
-
67
-
68
-
69
-
70
-
71
-
72
-
73
-
74
-
75
-
76
-
77
-
78
-
79
-
80
-
81
-
82
-
83
-
84
-
85
-
86
-
87
-
88
-
89
-
90
-
91
-
92
-
93
-
94
-
95
-
96
-
97
-
98
-
99
-
100
-
101
-
102
-
103
-
104
-
105
-
106
-
107
-
108
-
109
-
110
-
111
-
112
-
113
-
114
-
115
-
116
-
117
-
118
-
119
-
120
-
121
-
122
-
123
-
124
-
125
-
126
-
127
-
128
-
129
-
130
-
131
-
132
-
133
-
134
-
135
-
136
-
137
-
138
-
139
-
140
-
141
-
142
-
143
-
144
-
145
-
146
-
147
-
148
-
149
-
150
-
151
-
152
-
153
-
154
-
155
-
156
-
157
-
158
-
159
-
160
-
161
-
162
-
163
-
164
-
165
-
166
-
167
-
168
-
169
-
170
-
171
-
172
-
173
-
174
-
175
-
176
-
177
-
178
-
179
-
180
-
181
-
182
-
183
-
184
-
185
-
186
-
187
-
188
-
189
-
190
-
191
-
192
-
193
-
194
-
195
-
196
-
197
-
198
-
199
-
200
-
201
-
202
-
203
-
204
-
205
-
206
-
207
-
208
-
209
-
210
-
211
-
212
-
213
-
214
-
215
-
216
-
217
-
218
-
219
-
220
-
221
-
222
-
223
-
224
-
225
-
226
-
227
-
228
-
229
-
230
-
231
-
232
-
233
-
234
-
235
-
236
-
237
-
238
-
239
-
240
-
241
-
242
-
243
-
244
-
245
-
246
-
247
-
248
-
249
-
250
-
251
-
252
-
253
-
254
-
255
-
256
-
257
-
258
-
259
-
260
 |
 |