HP OmniBook 5500 HP OmniBook 5500 - User Guide, Windows 95 - Page 24
To remove the CD-ROM or floppy drive, To insert and eject a floppy disk
 |
View all HP OmniBook 5500 manuals
Add to My Manuals
Save this manual to your list of manuals |
Page 24 highlights
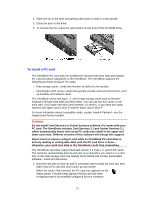
-or- • To connect the floppy drive to the OmniBook externally, pull out the floppy drive cable and connect it to the parallel port on the left side of the OmniBook. To remove the CD-ROM or floppy drive 1. Slide the switch to the right. A pull-tab pops out. 2. Pull the pull-tab firmly to remove the CD-ROM or floppy drive from the OmniBook. 3. Push the pull-tab back into the drive after you remove the drive from the OmniBook. To insert and eject a floppy disk When the OmniBook is reading or writing data to the floppy drive, the floppy disk icon appears on the Status panel. Caution Do not insert or remove a floppy disk while the OmniBook is actively reading or writing data. Wait until the floppy drive is done-otherwise, you could lose data or the OmniBook could stop responding. 24
-
 1
1 -
2
-
3
-
4
-
5
-
6
-
7
-
8
-
9
-
10
-
11
-
12
-
13
-
14
-
15
-
16
-
17
-
18
-
 19
19 -
 20
20 -
 21
21 -
 22
22 -
 23
23 -
 24
24 -
 25
25 -
 26
26 -
 27
27 -
 28
28 -
 29
29 -
30
-
31
-
32
-
33
-
34
-
35
-
36
-
37
-
38
-
39
-
40
-
41
-
42
-
43
-
44
-
45
-
46
-
47
-
48
-
49
-
50
-
51
-
52
-
53
-
54
-
55
-
56
-
57
-
58
-
59
-
60
-
61
-
62
-
63
-
64
-
65
-
66
-
67
-
68
-
69
-
70
-
71
-
72
-
73
-
74
-
75
-
76
-
77
-
78
-
79
-
80
-
81
-
82
-
83
-
84
-
85
-
86
-
87
-
88
-
89
-
90
 |
 |
