HP P Class 450/500/550/600/650/700/750 fx2+, fx4+, fx6+ graphics installation - Page 22
half-inch gap between the front edge of the panel and the front of
 |
View all HP P Class 450/500/550/600/650/700/750 manuals
Add to My Manuals
Save this manual to your list of manuals |
Page 22 highlights
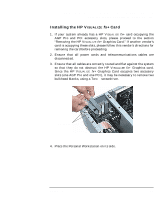
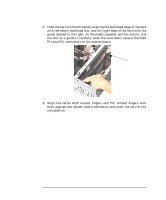
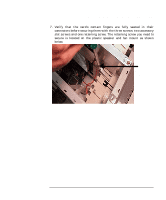
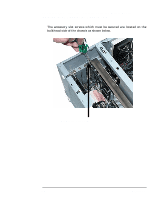
HP Visualize fx2+, fx4+, fx6+ Graphics Cards and Texture Module Installing the HP Visualize fx+ Graphics Card To replace the left-side panel, follow this procedure: 1. Place the panel guide over the system's inside-bottom edge, leaving a half-inch gap between the front edge of the panel and the front of the chassis. Hook Slot (There are four of them on this edge. The four panel hooks fit into these slots.) Panel Guide System's inside-bottom edge 0.5 inch gap 22 Chapter 1
-
 1
1 -
2
-
3
-
4
-
5
-
6
-
7
-
8
-
9
-
10
-
11
-
12
-
13
-
14
-
15
-
16
-
 17
17 -
 18
18 -
 19
19 -
 20
20 -
 21
21 -
 22
22 -
 23
23 -
 24
24 -
 25
25 -
 26
26 -
 27
27 -
28
-
29
-
30
-
31
-
32
-
33
-
34
-
35
-
36
-
37
-
38
-
39
-
40
-
41
-
42
-
43
-
44
-
45
-
46
-
47
-
48
-
49
-
50
-
51
-
52
-
53
-
54
-
55
-
56
-
57
-
58
-
59
-
60
 |
 |

22
Chapter 1
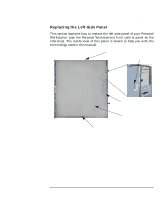
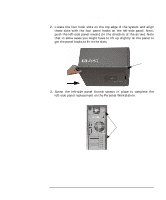
HP Visualize fx2+, fx4+, fx6+ Graphics Cards and Texture Module
Installing the HP Visualize fx+ Graphics Card
To replace the left-side panel, follow this procedure:
1.
Place the panel guide over the system’s inside-bottom edge, leaving a
half-inch gap between the front edge of the panel and the front of the
chassis.
System’s inside-bottom edge
Panel Guide
Hook Slot (There are
four of them on this
edge. The four panel
hooks fit into these
slots.)
0.5 inch gap