HP P Class 450/500/550/600/650/700/750 fx2+, fx4+, fx6+ graphics installation - Page 23
Thumb Screws
 |
View all HP P Class 450/500/550/600/650/700/750 manuals
Add to My Manuals
Save this manual to your list of manuals |
Page 23 highlights
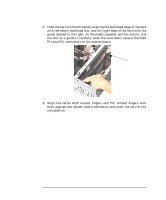
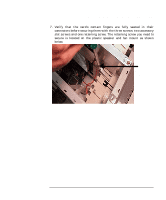
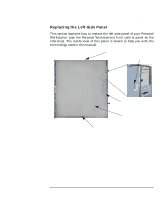
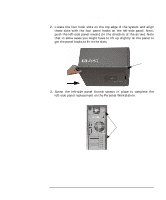
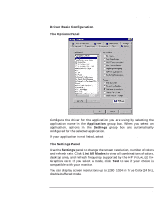
HP Visualize fx2+, fx4+, fx6+ Graphics Cards and Texture Module Installing the HP Visualize fx+ Graphics Card 2. Locate the four hook slots on the top edge of the system and align these slots with the four panel hooks on the left-side panel. Next, push the left-side panel inward (in the direction of the arrow). Note that in some cases you might have to lift up slightly on the panel to get the panel hooks to fit in the slots. Gap is aprox. 0.5 inches 3. Screw the left-side panel thumb screws in place to complete the left-side panel replacement on the Personal Workstation. Thumb Screws Chapter 1 23
-
 1
1 -
2
-
3
-
4
-
5
-
6
-
7
-
8
-
9
-
10
-
11
-
12
-
13
-
14
-
15
-
16
-
17
-
 18
18 -
 19
19 -
 20
20 -
 21
21 -
 22
22 -
 23
23 -
 24
24 -
 25
25 -
 26
26 -
 27
27 -
 28
28 -
29
-
30
-
31
-
32
-
33
-
34
-
35
-
36
-
37
-
38
-
39
-
40
-
41
-
42
-
43
-
44
-
45
-
46
-
47
-
48
-
49
-
50
-
51
-
52
-
53
-
54
-
55
-
56
-
57
-
58
-
59
-
60
 |
 |

Chapter 1
23
HP Visualize fx2+, fx4+, fx6+ Graphics Cards and Texture Module
Installing the HP Visualize fx+ Graphics Card
2.
Locate the four hook slots on the top edge of the system and align
these slots with the four panel hooks on the left-side panel. Next,
push the left-side panel inward (in the direction of the arrow). Note
that in some cases you might have to lift up slightly on the panel to
get the panel hooks to fit in the slots.
3.
Screw the left-side panel thumb screws in place to complete the
left-side panel replacement on the Personal Workstation.
Gap is aprox.
0.5 inches
Thumb Screws