HP PageWide Enterprise Color MFP 586 User Guide - Page 104
File Settings, In the, area, set the default file settings preferences.,
 |
View all HP PageWide Enterprise Color MFP 586 manuals
Add to My Manuals
Save this manual to your list of manuals |
Page 104 highlights
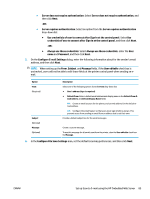
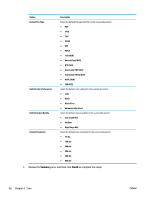
Feature Sharpness Image Preview Cropping Options Job Build Automatic Tone Multi-feed Detection Erase Edges Description Select a value to adjust the sharpness of the file. Select whether to require or make optional a displayed preview of the job or to disable a preview. Select whether or not to allow a job to be cropped and the type of cropping option. Select this setting to combine several sets of original documents into one email attachment. Also, use this setting to scan an original document that has more pages than the document feeder can accommodate at one time. Select this setting to set to automatic the Darkness, Contrast, and Background cleanup settings, which then makes these settings unavailable on this page. Select this setting to enable detection of multi-feed jobs. Select this setting to specify the width of edge margins to be erased, in either inches or millimeters, for the front side and back side of a job. 9. In the File Settings area, set the default file settings preferences. File settings: Feature File Name Prefix Default File Name File Name Suffix File Number Format Default File Type File Name Preview Default Color Preference Default Output Quality Default Resolution Compression Black TIFF Compression Color/Grayscale TIFF Compression Description Set the default file name prefix used for files saved to a network folder. Default file name for the file to be saved. Select the User editable check box to make this setting editable at the product control panel. Set the default file name suffix used for files saved to a network folder. Duplicate filename suffix default [filename]_YYYYMMDDT Select a file name format for when the job is divided into multiple files. Select the file format for the saved file. Select the User editable check box to make this setting editable at the product control panel. Enter a file name, and then click the Update Preview button. Select whether the file is in black & white or in color. Select the quality for the file. Higher-quality images require a larger file size than lower-quality images, and they take more time to send. Set the resolution for the file. Higher resolution images have more dots per inch (dpi), so they show more detail. Lower resolution images have fewer dots per inch and show less detail, but the file size is smaller. Specify if the file uses Normal or High compression when saving a scanned document as a PDF or XPS file. If compression is set to High, the scanned file is smaller, but the scanning process might take longer than Normal compression. Select the black TIFF compression algorithm to be used to compress the generated TIFF file. Select the color/grayscale TIFF compression algorithm to be used to compress the generated TIFF file. 90 Chapter 6 Scan ENWW
-
 1
1 -
2
-
3
-
4
-
5
-
6
-
7
-
8
-
9
-
10
-
11
-
12
-
13
-
14
-
15
-
16
-
17
-
18
-
19
-
20
-
21
-
22
-
23
-
24
-
25
-
26
-
27
-
28
-
29
-
30
-
31
-
32
-
33
-
34
-
35
-
36
-
37
-
38
-
39
-
40
-
41
-
42
-
43
-
44
-
45
-
46
-
47
-
48
-
49
-
50
-
51
-
52
-
53
-
54
-
55
-
56
-
57
-
58
-
59
-
60
-
61
-
62
-
63
-
64
-
65
-
66
-
67
-
68
-
69
-
70
-
71
-
72
-
73
-
74
-
75
-
76
-
77
-
78
-
79
-
80
-
81
-
82
-
83
-
84
-
85
-
86
-
87
-
88
-
89
-
90
-
91
-
92
-
93
-
94
-
95
-
96
-
97
-
98
-
 99
99 -
 100
100 -
 101
101 -
 102
102 -
 103
103 -
 104
104 -
 105
105 -
 106
106 -
 107
107 -
 108
108 -
 109
109 -
110
-
111
-
112
-
113
-
114
-
115
-
116
-
117
-
118
-
119
-
120
-
121
-
122
-
123
-
124
-
125
-
126
-
127
-
128
-
129
-
130
-
131
-
132
-
133
-
134
-
135
-
136
-
137
-
138
-
139
-
140
-
141
-
142
-
143
-
144
-
145
-
146
-
147
-
148
-
149
-
150
-
151
-
152
-
153
-
154
-
155
-
156
-
157
-
158
-
159
-
160
-
161
-
162
-
163
-
164
-
165
-
166
-
167
-
168
-
169
-
170
-
171
-
172
-
173
-
174
-
175
-
176
-
177
-
178
-
179
-
180
-
181
-
182
-
183
-
184
-
185
-
186
-
187
-
188
-
189
-
190
-
191
-
192
-
193
-
194
-
195
-
196
-
197
-
198
-
199
-
200
-
201
-
202
-
203
-
204
-
205
-
206
-
207
-
208
-
209
-
210
-
211
-
212
-
213
-
214
-
215
-
216
-
217
-
218
-
219
-
220
-
221
-
222
-
223
-
224
-
225
-
226
-
227
-
228
-
229
-
230
-
231
-
232
-
233
-
234
-
235
-
236
-
237
-
238
-
239
-
240
-
241
-
242
-
243
-
244
-
245
-
246
-
247
-
248
-
249
-
250
 |
 |
