HP PageWide Enterprise Color MFP 586 User Guide - Page 214
Check paper and the printing environment, Step one: Use paper that meets HP specifications
 |
View all HP PageWide Enterprise Color MFP 586 manuals
Add to My Manuals
Save this manual to your list of manuals |
Page 214 highlights
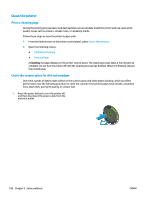
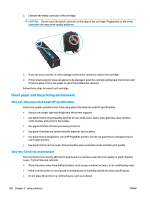
2. Examine the metal connector of the cartridge. CAUTION: Do not touch the metal connector on the edge of the cartridge. Fingerprints on the metal connector can cause print-quality problems. C 3. If you see any scratches, or other damage on the metal connector, replace the cartridge. 4. If the metal connector does not appear to be damaged, push the cartridge gently back into its slot until it locks in place. Print a few pages to see if the problem has resolved. Follow these steps to inspect each cartridge. Check paper and the printing environment Step one: Use paper that meets HP specifications Some print-quality problems arise from using paper that does not meet HP specifications. ● Always use a paper type and weight that this printer supports. ● Use paper that is of good quality and free of cuts, nicks, tears, spots, loose particles, dust, wrinkles, voids, staples, and curled or bent edges. ● Use paper that has not been previously printed on. ● Use paper that does not contain metallic material, such as glitter. ● Use paper that is designed for use in HP PageWide printers. Do not use paper that is designed only for use in laser printers. ● Use paper that is not too rough. Using smoother paper generally results in better print quality. Step two: Check the environment The environment can directly affect print quality and is a common cause for print-quality or paper-feeding issues. Try the following solutions: ● Move the printer away from drafty locations, such as open windows or doors, or air-conditioning vents. ● Make sure the printer is not exposed to temperatures or humidity outside of printer specifications. ● Do not place the printer in a confined space, such as a cabinet. 200 Chapter 9 Solve problems ENWW
-
 1
1 -
2
-
3
-
4
-
5
-
6
-
7
-
8
-
9
-
10
-
11
-
12
-
13
-
14
-
15
-
16
-
17
-
18
-
19
-
20
-
21
-
22
-
23
-
24
-
25
-
26
-
27
-
28
-
29
-
30
-
31
-
32
-
33
-
34
-
35
-
36
-
37
-
38
-
39
-
40
-
41
-
42
-
43
-
44
-
45
-
46
-
47
-
48
-
49
-
50
-
51
-
52
-
53
-
54
-
55
-
56
-
57
-
58
-
59
-
60
-
61
-
62
-
63
-
64
-
65
-
66
-
67
-
68
-
69
-
70
-
71
-
72
-
73
-
74
-
75
-
76
-
77
-
78
-
79
-
80
-
81
-
82
-
83
-
84
-
85
-
86
-
87
-
88
-
89
-
90
-
91
-
92
-
93
-
94
-
95
-
96
-
97
-
98
-
99
-
100
-
101
-
102
-
103
-
104
-
105
-
106
-
107
-
108
-
109
-
110
-
111
-
112
-
113
-
114
-
115
-
116
-
117
-
118
-
119
-
120
-
121
-
122
-
123
-
124
-
125
-
126
-
127
-
128
-
129
-
130
-
131
-
132
-
133
-
134
-
135
-
136
-
137
-
138
-
139
-
140
-
141
-
142
-
143
-
144
-
145
-
146
-
147
-
148
-
149
-
150
-
151
-
152
-
153
-
154
-
155
-
156
-
157
-
158
-
159
-
160
-
161
-
162
-
163
-
164
-
165
-
166
-
167
-
168
-
169
-
170
-
171
-
172
-
173
-
174
-
175
-
176
-
177
-
178
-
179
-
180
-
181
-
182
-
183
-
184
-
185
-
186
-
187
-
188
-
189
-
190
-
191
-
192
-
193
-
194
-
195
-
196
-
197
-
198
-
199
-
200
-
201
-
202
-
203
-
204
-
205
-
206
-
207
-
208
-
 209
209 -
 210
210 -
 211
211 -
 212
212 -
 213
213 -
 214
214 -
 215
215 -
 216
216 -
 217
217 -
 218
218 -
 219
219 -
220
-
221
-
222
-
223
-
224
-
225
-
226
-
227
-
228
-
229
-
230
-
231
-
232
-
233
-
234
-
235
-
236
-
237
-
238
-
239
-
240
-
241
-
242
-
243
-
244
-
245
-
246
-
247
-
248
-
249
-
250
 |
 |
