HP PageWide Enterprise Color MFP 586 User Guide - Page 119
Set up Save to USB using the HP Embedded Web Server, Introduction, Before you begin
 |
View all HP PageWide Enterprise Color MFP 586 manuals
Add to My Manuals
Save this manual to your list of manuals |
Page 119 highlights
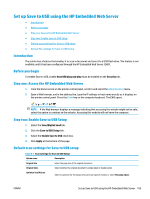
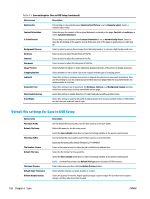
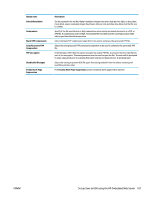
Set up Save to USB using the HP Embedded Web Server ● Introduction ● Before you begin ● Step one: Access the HP Embedded Web Server ● Step two: Enable Save to USB Setup ● Default scan settings for Save to USB setup ● Default file settings for Save to USB Setup Introduction The printer has a feature that enables it to scan a document and save it to a USB flash drive. The feature is not available until it has been configured through the HP Embedded Web Server (EWS). Before you begin To enable Save to USB, enable Host USB plug and play must be enabled on the Security tab. Step one: Access the HP Embedded Web Server 1. From the Home screen on the printer control panel, scroll to and select the Administration menu. 2. Open a Web browser, and in the address line, type the IP address or host name exactly as it displays on the printer control panel. Press the Enter key on the computer keyboard. The EWS opens. NOTE: If the Web browser displays a message indicating that accessing the website might not be safe, select the option to continue to the website. Accessing this website will not harm the computer. Step two: Enable Save to USB Setup 1. Select the Scan/Digital Send tab. 2. Click the Save to USB Setup link. 3. Select the Enable Save to USB check box. 4. Click Apply at the bottom of the page. Default scan settings for Save to USB setup Table 6-1 Scan settings for Save to USB Setup: Option name Description Original Size Original Sides Select the page size of the original document. Select whether the original document is single-sided or double-sided. Optimize Text/Picture Select to optimize for the output of a particular type of content, or select Manually adjust. ENWW Set up Save to USB using the HP Embedded Web Server 105
-
 1
1 -
2
-
3
-
4
-
5
-
6
-
7
-
8
-
9
-
10
-
11
-
12
-
13
-
14
-
15
-
16
-
17
-
18
-
19
-
20
-
21
-
22
-
23
-
24
-
25
-
26
-
27
-
28
-
29
-
30
-
31
-
32
-
33
-
34
-
35
-
36
-
37
-
38
-
39
-
40
-
41
-
42
-
43
-
44
-
45
-
46
-
47
-
48
-
49
-
50
-
51
-
52
-
53
-
54
-
55
-
56
-
57
-
58
-
59
-
60
-
61
-
62
-
63
-
64
-
65
-
66
-
67
-
68
-
69
-
70
-
71
-
72
-
73
-
74
-
75
-
76
-
77
-
78
-
79
-
80
-
81
-
82
-
83
-
84
-
85
-
86
-
87
-
88
-
89
-
90
-
91
-
92
-
93
-
94
-
95
-
96
-
97
-
98
-
99
-
100
-
101
-
102
-
103
-
104
-
105
-
106
-
107
-
108
-
109
-
110
-
111
-
112
-
113
-
 114
114 -
 115
115 -
 116
116 -
 117
117 -
 118
118 -
 119
119 -
 120
120 -
 121
121 -
 122
122 -
 123
123 -
 124
124 -
125
-
126
-
127
-
128
-
129
-
130
-
131
-
132
-
133
-
134
-
135
-
136
-
137
-
138
-
139
-
140
-
141
-
142
-
143
-
144
-
145
-
146
-
147
-
148
-
149
-
150
-
151
-
152
-
153
-
154
-
155
-
156
-
157
-
158
-
159
-
160
-
161
-
162
-
163
-
164
-
165
-
166
-
167
-
168
-
169
-
170
-
171
-
172
-
173
-
174
-
175
-
176
-
177
-
178
-
179
-
180
-
181
-
182
-
183
-
184
-
185
-
186
-
187
-
188
-
189
-
190
-
191
-
192
-
193
-
194
-
195
-
196
-
197
-
198
-
199
-
200
-
201
-
202
-
203
-
204
-
205
-
206
-
207
-
208
-
209
-
210
-
211
-
212
-
213
-
214
-
215
-
216
-
217
-
218
-
219
-
220
-
221
-
222
-
223
-
224
-
225
-
226
-
227
-
228
-
229
-
230
-
231
-
232
-
233
-
234
-
235
-
236
-
237
-
238
-
239
-
240
-
241
-
242
-
243
-
244
-
245
-
246
-
247
-
248
-
249
-
250
 |
 |
