HP Pavilion xt100 HP Pavilion Notebook PC - ze4100 and xt100 Series (KA, KB) - - Page 23
Step 4: Turn on the computer, Step 5: Set up Windows
 |
View all HP Pavilion xt100 manuals
Add to My Manuals
Save this manual to your list of manuals |
Page 23 highlights
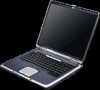
Getting Started with Your HP Notebook Setting Up Your Computer Step 4: Turn on the computer • Press the power button above the left side of the keyboard. The computer then boots up, and Windows starts automatically. Hint If your computer does not turn on when operating on battery power, the battery may be out of power. Plug in the AC adapter and press the power button again. Leave the AC adapter plugged in for at least an hour-or 2-3 hours to charge it fully. Step 5: Set up Windows Your notebook computer has Microsoft Windows preinstalled on its hard disk drive. The first time you turn on your computer, the Windows Setup program runs automatically so you can customize your setup. 1. Follow the Setup program's instructions as they appear on the screen. If the program prompts you to enter the Product ID code, you will find this code on the bottom of the computer. 2. If your computer has a modem, check the modem's country or region settings: click Start, Control Panel, Printers and Other Hardware, Phone and Modem Options, and then click Edit on the Dialing Rules tab. Reference Guide 23
-
 1
1 -
2
-
3
-
4
-
5
-
6
-
7
-
8
-
9
-
10
-
11
-
12
-
13
-
14
-
15
-
16
-
17
-
 18
18 -
 19
19 -
 20
20 -
 21
21 -
 22
22 -
 23
23 -
 24
24 -
 25
25 -
 26
26 -
 27
27 -
 28
28 -
29
-
30
-
31
-
32
-
33
-
34
-
35
-
36
-
37
-
38
-
39
-
40
-
41
-
42
-
43
-
44
-
45
-
46
-
47
-
48
-
49
-
50
-
51
-
52
-
53
-
54
-
55
-
56
-
57
-
58
-
59
-
60
-
61
-
62
-
63
-
64
-
65
-
66
-
67
-
68
-
69
-
70
-
71
-
72
-
73
-
74
-
75
-
76
-
77
-
78
-
79
-
80
-
81
-
82
-
83
-
84
-
85
-
86
-
87
-
88
-
89
-
90
-
91
-
92
-
93
-
94
-
95
-
96
-
97
-
98
-
99
-
100
-
101
-
102
-
103
-
104
-
105
-
106
-
107
-
108
-
109
-
110
-
111
-
112
-
113
-
114
-
115
-
116
-
117
-
118
-
119
-
120
-
121
-
122
-
123
-
124
-
125
-
126
-
127
-
128
-
129
-
130
-
131
-
132
-
133
-
134
-
135
-
136
-
137
-
138
-
139
-
140
-
141
-
142
-
143
-
144
-
145
-
146
-
147
-
148
-
149
-
150
-
151
-
152
-
153
-
154
-
155
-
156
-
157
-
158
-
159
-
160
 |
 |