HP Photosmart D7300 User Guide - Page 30
Getting creative, Video Enhancement
 |
View all HP Photosmart D7300 manuals
Add to My Manuals
Save this manual to your list of manuals |
Page 30 highlights
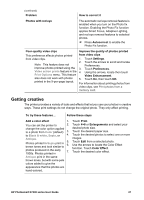
(continued) Problem How to correct it Photos with red eye The automatic red eye removal feature is enabled when you turn on the Photo fix function. Enabling the Photo Fix function applies Smart Focus, Adaptive Lighting, and red eye removal features to selected photos. ➔ Press Autocorrect to enable the Photo Fix function. Poor-quality video clips This preference affects photos printed from video clips. Note This feature does not improve photos printed using the Video action prints feature in the Print Options menu. This feature also does not work with photos printed in the 9-per-page layout. Improve the quality of photos printed from video clips 1. Touch Settings. 2. Touch the arrows to scroll and locate Preferences. 3. Touch Preferences. 4. Using the arrows, locate then touch Video Enhancement. 5. Touch On, then touch OK. For information about printing photos from video clips, see Print photos from a memory card. Getting creative The printer provides a variety of tools and effects that let you use your photos in creative ways. These print settings do not change the original photo. They only affect printing. To try these features... Follow these steps Add a color effect 1. You can set the printer to 2. change the color option applied to a photo from Color (default) 3. to Black & white, Sepia, or 4. Antique. Photos printed in Sepia print in brown tones and look similar to 5. 6. photos produced in the early 1900s. Photos printed in 7. Antique print in the same brown tones, but with some pale colors added to give the appearance that the photos are hand-colored. Touch Print. Touch 4×6 or Enlargements and select your desired photo size. Touch the desired paper size. Touch the desired photos to select one or more images. Touch Edit from a selected photo. Use the arrows to locate the Color Effect function. Touch Color Effect. Touch the desired color effect. HP Photosmart D7300 series User Guide 27
-
 1
1 -
2
-
3
-
4
-
5
-
6
-
7
-
8
-
9
-
10
-
11
-
12
-
13
-
14
-
15
-
16
-
17
-
18
-
19
-
20
-
21
-
22
-
23
-
24
-
 25
25 -
 26
26 -
 27
27 -
 28
28 -
 29
29 -
 30
30 -
 31
31 -
 32
32 -
 33
33 -
 34
34 -
 35
35 -
36
-
37
-
38
-
39
-
40
-
41
-
42
-
43
-
44
-
45
-
46
-
47
-
48
-
49
-
50
-
51
-
52
-
53
-
54
-
55
-
56
-
57
-
58
-
59
-
60
-
61
-
62
-
63
-
64
-
65
-
66
-
67
-
68
-
69
-
70
-
71
 |
 |