HP Photosmart D7300 User Guide - Page 31
Date Stamp, Other Projects - printing green photos
 |
View all HP Photosmart D7300 manuals
Add to My Manuals
Save this manual to your list of manuals |
Page 31 highlights
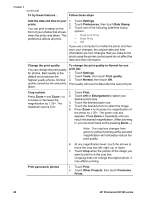
Chapter 3 (continued) To try these features... Follow these steps Add the date and time to your 1. prints 2. You can print a stamp on the 3. front of your photos that shows when the photo was taken. This preference affects all prints. Touch Settings. Touch Preferences, then touch Date Stamp. Touch one of the following date/time stamp options: - Date and Time - Date Only - Off If you use a computer to modify the photo and then save your changes, the original date and time information are lost. Changes that you make to the photo using the printer control panel do not affect the date and time information. Change the print quality You can change the print quality for photos. Best quality is the default and produces the highest quality photos. Normal quality conserves ink and prints faster. To change the print quality to Normal for one print job: 1. Touch Settings. 2. Touch Tools, then touch Print quality. 3. Touch Normal, then touch OK. Print quality will revert to Best after the next print job. Crop a photo Press Zoom + and Zoom - to increase or decrease the magnification by 1.25×. The maximum level is 5.0×. 1. Touch Print. 2. Touch 4×6 or Enlargement to select your desired photo size. 3. Touch the desired paper size. 4. Touch the desired photo to select the image. 5. Press Zoom + to increase the magnification of the photo by 1.25×. The green crop box appears. Press Zoom + repeatedly until you reach the desired magnification. (After zooming in, you can zoom back out by pressing Zoom -.) Note The crop box changes from green to yellow if printing at the selected magnification will noticeably reduce the print quality. 6. At any magnification level, touch the arrows to move the crop box left, right, up, or down. 7. Touch Crop when the portion of the image you want to print is in the crop box. Cropping does not change the original photo. It only affects printing. Print panoramic photos 1. Touch Print. 2. Touch Other Projects, then touch Panorama Prints. 28 HP Photosmart D7300 series
-
 1
1 -
2
-
3
-
4
-
5
-
6
-
7
-
8
-
9
-
10
-
11
-
12
-
13
-
14
-
15
-
16
-
17
-
18
-
19
-
20
-
21
-
22
-
23
-
24
-
25
-
 26
26 -
 27
27 -
 28
28 -
 29
29 -
 30
30 -
 31
31 -
 32
32 -
 33
33 -
 34
34 -
 35
35 -
 36
36 -
37
-
38
-
39
-
40
-
41
-
42
-
43
-
44
-
45
-
46
-
47
-
48
-
49
-
50
-
51
-
52
-
53
-
54
-
55
-
56
-
57
-
58
-
59
-
60
-
61
-
62
-
63
-
64
-
65
-
66
-
67
-
68
-
69
-
70
-
71
 |
 |
