HP Scanjet 1000 User Guide - Page 10
Front components, Getting started
 |
View all HP Scanjet 1000 manuals
Add to My Manuals
Save this manual to your list of manuals |
Page 10 highlights
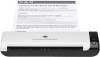
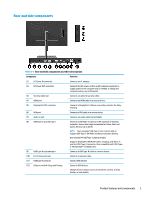
Table 1-1 Rear and side components and their descriptions (continued) Component Function (13) USB Type-A port Connects a USB device. (14) Audio-out (headset) jack Connects optional headphones, earbuds, a headset, or a television audio cable. WARNING! To reduce the risk of personal injury, reduce the volume before using headphones, earbuds, or a headset. For additional safety information, see the Product Notices provided in your documentation kit. Front components Table 1-2 Front components and descriptions Component Function (1) Camera microphones Allow you to participate in a video conference. (2) Camera light On: Camera is in use. (3) Camera Transmits your image in a video conference. (4) Menu button Press to open the OSD menu, select a menu item from the OSD, or close the OSD menu. An indicator is activated above the Menu button when the OSD menu is open. (5) Function buttons (assignable*) When the OSD menu is open, press the buttons to navigate through the menu. Lighted icons above the buttons indicate their functions. For a description of these functions, see Using the function buttons on page 21. (6) Power button (with power Turns the monitor on or off. light) * You can reconfigure the function buttons in the OSD menu to quickly select the most commonly used operations. See Using the function buttons on page 21 for more information. 4 Chapter 1 Getting started
-
 1
1 -
2
-
3
-
4
-
 5
5 -
 6
6 -
 7
7 -
 8
8 -
 9
9 -
 10
10 -
 11
11 -
 12
12 -
 13
13 -
 14
14 -
 15
15 -
16
-
17
-
18
-
19
-
20
-
21
-
22
-
23
-
24
-
25
-
26
-
27
-
28
-
29
-
30
-
31
-
32
-
33
-
34
-
35
-
36
-
37
-
38
-
39
-
40
-
41
-
42
-
43
-
44
-
45
-
46
-
47
 |
 |
