HP Scanjet 1000 User Guide - Page 27
Using the function buttons, and then select one of the available
 |
View all HP Scanjet 1000 manuals
Add to My Manuals
Save this manual to your list of manuals |
Page 27 highlights
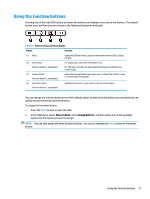
Using the function buttons Pressing one of the four OSD buttons activates the buttons and displays icons above the buttons. The default button icons and functions are shown in the following illustration and table. Table 2-2 Button names and descriptions Button Function (1) Menu Opens the OSD main menu, selects a menu item from the OSD, or closes the OSD. (2) Information (function button 3, assignable) For digital input, opens the Information menu. For VGA input, activates the auto-adjustment feature to optimize the screen image. (3) Viewing Modes (function button 2, assignable) Opens the Viewing Modes menu where you can adjust the monitor screen to a comfortable viewing light. (4) Next Active Input (function button 1, assignable) Switches the monitor's input source to the next active input. You can change the function buttons from their default values so that when the buttons are activated you can quickly access commonly used menu items. To assign the function buttons: 1. Press the Menu button to open the OSD. 2. In the OSD menu, select Menu Control, select Assign Buttons, and then select one of the available options for the button you want to assign. NOTE: You can only assign the three function buttons. You can not reassign the Menu button or the power button. Using the function buttons 21
-
 1
1 -
2
-
3
-
4
-
5
-
6
-
7
-
8
-
9
-
10
-
11
-
12
-
13
-
14
-
15
-
16
-
17
-
18
-
19
-
20
-
21
-
 22
22 -
 23
23 -
 24
24 -
 25
25 -
 26
26 -
 27
27 -
 28
28 -
 29
29 -
 30
30 -
 31
31 -
 32
32 -
33
-
34
-
35
-
36
-
37
-
38
-
39
-
40
-
41
-
42
-
43
-
44
-
45
-
46
-
47
 |
 |
