HP Scanjet 1000 User Guide - Page 29
Changing the Power Mode setting, Selecting the Low Blue Light mode, DisplayPort multistreaming over
 |
View all HP Scanjet 1000 manuals
Add to My Manuals
Save this manual to your list of manuals |
Page 29 highlights
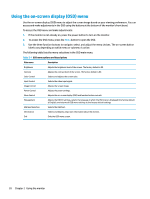
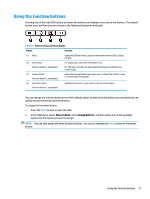
Changing the Power Mode setting When in sleep mode, to comply with international power standards, the monitor default setting is Power Saver mode. If your display supports Performance mode, then to keep the USB ports enabled even when the monitor is in Auto-Sleep Mode, change the Power Mode setting from Power Saver to Performance. To change the Power Mode setting: 1. Press the Menu button to open the OSD menu. 2. Select Power Control, select Power Mode, and then select Performance. 3. Select Save and close the OSD. Selecting the Low Blue Light mode Decreasing the blue light emitted by the monitor reduces the blue light exposure to your eyes. HP monitors provide settings to reduce the blue light output and create a more relaxing and less stimulating image while you view content on the screen. To adjust your monitor to a comfortable viewing light, follow these steps: 1. Press one of the four OSD bezel buttons on the bottom of the monitor to display the OSD icons on the screen. 2. Press the Viewing Modes button to open the Viewing Modes menu, or press the Menu button, select Color Control, and then select Viewing Modes. 3. Select a desired setting: ● Low Blue Light (TUV certified): Reduces blue light for improved eye comfort ● Night: Adjusts the monitor to the lowest blue light output ● Reading: Optimizes both blue light and brightness for indoor viewing 4. Select Save and Return to save your setting and close the Viewing Modes menu. Select Cancel if you don't want to save the setting. 5. Select Exit from the OSD main menu. WARNING! To reduce the risk of serious injury, read the Safety & Comfort Guide. It describes proper workstation setup, and proper posture, health, and work habits for computer users. The Safety & Comfort Guide also provides important electrical and mechanical safety information. The Safety & Comfort Guide is available on the Web at http://www.hp.com/ergo. DisplayPort multistreaming over USB Type-C If you are using USB Type-C as the primary video input source, you can multistream to other DisplayPort monitors connected in a daisy chain configuration. You can connect up to four monitors in this configuration if the graphics card in your computer supports this configuration. The number of monitors you can connect through DisplayPort multistreaming depends on a number of factors, including the resolutions and scan rates used for each monitor and the capabilities of your GPU or embedded graphics system. Check the manual that came with your graphics card for further information about its capabilities. To multistream: 1. Be sure that USB Type-C is used for your primary video input. You can also use USB Type-B-to-USB Type-A for multistreaming. Changing the Power Mode setting 23
-
 1
1 -
2
-
3
-
4
-
5
-
6
-
7
-
8
-
9
-
10
-
11
-
12
-
13
-
14
-
15
-
16
-
17
-
18
-
19
-
20
-
21
-
22
-
23
-
 24
24 -
 25
25 -
 26
26 -
 27
27 -
 28
28 -
 29
29 -
 30
30 -
 31
31 -
 32
32 -
 33
33 -
 34
34 -
35
-
36
-
37
-
38
-
39
-
40
-
41
-
42
-
43
-
44
-
45
-
46
-
47
 |
 |