HP Server tc3100 hp server tc3100 operation and maintenance guide (English, v1 - Page 22
Installing Hard Disk Drives, Installed Mass Storage Devices
 |
View all HP Server tc3100 manuals
Add to My Manuals
Save this manual to your list of manuals |
Page 22 highlights
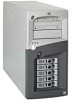
Chapter 3 Installing and Configuring 6. PCI slot 5 7. PCI slot 4 8. PCI slot 3 9. PCI slot 2 10. PCI slot 1 11. Embedded LAN For information about booting off of a hard disk connected to an accessory board, see "Installing a Disk Array Controller Board" later in this chapter. NOTE The boot order can be changed using the server's (BIOS) Setup Utility and the SCSI Select Utility. See "BIOS Setup Utility" later in this chapter. Installed Mass Storage Devices Table 3-1 lists the number and types of mass storage devices that may be installed in the HP Server tc3100. Table 3-1. Mass Storage Device Types Interface Types Max Number of Devices Installed Devices and Addresses Flexible disk drive 1 Factory installed flexible disk IDE-2 1 Factory installed CD-ROM drive (IDE connector) Ultra SCSI Adapter 1* (optional) Optional SCSI Tape Backup Drive (address = ID 4) Ultra-3 SCSI Channel A up to 15 ** Control of up to 15 external SCSI devices or internal backup tape. Ultra-3 SCSI Channel B up to 5** Up to 5 SCSI hard disk drives (addresses = ID 0, 1, 2, 3, 8) Embedded SCSI controller (address = ID 7) * A 50-to-68-pin SCSI adapter is provided with the HP tape drive. ** Both SCSI channels (A and B) can each support up to 15 devices; however, there are only enough internal storage shelves for five hard drives and one optional tape backup device. Channel A is used to control external SCSI devices or internal backup tape. Installing Hard Disk Drives WARNING Always wear a wrist strap and use a static-dissipating work surface connected to the chassis when handling components. Ensure the metal of the wrist strap contacts your skin. The flexible disk, CD-ROM, and optional disk do not have protective shields; they are ESD sensitive. Caution must be taken when removing them to avoid electrical shock. Install and remove connectors carefully, and avoid displacing any of the pins. 16
-
 1
1 -
2
-
3
-
4
-
5
-
6
-
7
-
8
-
9
-
10
-
11
-
12
-
13
-
14
-
15
-
16
-
 17
17 -
 18
18 -
 19
19 -
 20
20 -
 21
21 -
 22
22 -
 23
23 -
 24
24 -
 25
25 -
 26
26 -
 27
27 -
28
-
29
-
30
-
31
-
32
-
33
-
34
-
35
-
36
-
37
-
38
-
39
-
40
-
41
-
42
-
43
-
44
-
45
-
46
-
47
-
48
-
49
-
50
-
51
-
52
-
53
-
54
-
55
-
56
-
57
-
58
-
59
-
60
-
61
-
62
-
63
-
64
-
65
-
66
-
67
-
68
-
69
-
70
-
71
-
72
-
73
-
74
-
75
-
76
-
77
-
78
-
79
-
80
-
81
-
82
-
83
-
84
-
85
-
86
-
87
-
88
-
89
-
90
-
91
-
92
-
93
-
94
-
95
-
96
-
97
-
98
-
99
-
100
-
101
-
102
-
103
-
104
-
105
-
106
-
107
-
108
-
109
-
110
-
111
 |
 |
