HP Server tc3100 hp server tc3100 operation and maintenance guide (English, v1 - Page 36
Installing the Heatsink, Installing Heatsink
 |
View all HP Server tc3100 manuals
Add to My Manuals
Save this manual to your list of manuals |
Page 36 highlights
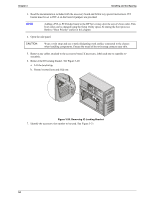
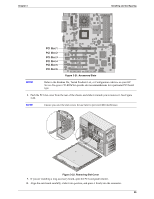
Chapter 3 Installing and Configuring Installing the Heatsink Once the processor is installed, the cooling fan-heatsink must be installed on top of the processor. Each processor requires a heatsink, with its cooling fan attached, and a thermal interface material (grease) between the processor and the heatsink. The heatsink is mechanically connected to the processor socket with both latches, mechanically making contact with processor. HP recommends you do not reuse a heatsink. 1. Remove the heatsink-fan assembly from the shipping container and ensure you do not touch the thermal interface material on the bottom of the heatsink. 2. Ensure the latches are free and pointing away from the heatsink. 3. Position the heatsink over the second processor and: a. Tilt or roll it slightly to the rear of the chassis to help engage the hook latch and then connect the hook latch to the tab. CAUTION Take care not to move the nearby capacitors. b. Rotate the heatsink back, placing it squarely on top of the processor and connect the thumb latch to the tabs on the base of the processor socket on the side shown in Figure 3-19. The rail and guide on the heatsink bottom will help you to center the heatsink. CAUTION Do not apply too much force when connecting the thumb latch to the tab on the base of the processor socket, otherwise, you may damage the components on the system board. The thumb latches hook underneath the tabs extending from the base of the processor socket base. c. Ensure the ridge on the bottom of the heatsink rests between the processor and the edge of the processor socket base. CAUTION Figure 3-19. Installing Heatsink Ensure you have made good contact with the processor to avoid thermal overheating. If you have not made good contact, the processor will overheat within 20 seconds of power on and will shut down, possibly causing damage to the processor. 30
-
 1
1 -
2
-
3
-
4
-
5
-
6
-
7
-
8
-
9
-
10
-
11
-
12
-
13
-
14
-
15
-
16
-
17
-
18
-
19
-
20
-
21
-
22
-
23
-
24
-
25
-
26
-
27
-
28
-
29
-
30
-
 31
31 -
 32
32 -
 33
33 -
 34
34 -
 35
35 -
 36
36 -
 37
37 -
 38
38 -
 39
39 -
 40
40 -
 41
41 -
42
-
43
-
44
-
45
-
46
-
47
-
48
-
49
-
50
-
51
-
52
-
53
-
54
-
55
-
56
-
57
-
58
-
59
-
60
-
61
-
62
-
63
-
64
-
65
-
66
-
67
-
68
-
69
-
70
-
71
-
72
-
73
-
74
-
75
-
76
-
77
-
78
-
79
-
80
-
81
-
82
-
83
-
84
-
85
-
86
-
87
-
88
-
89
-
90
-
91
-
92
-
93
-
94
-
95
-
96
-
97
-
98
-
99
-
100
-
101
-
102
-
103
-
104
-
105
-
106
-
107
-
108
-
109
-
110
-
111
 |
 |
