HP Server tc3100 hp server tc3100 operation and maintenance guide (English, v1 - Page 24
Installing Optional SCSI Accessory Cable, Removing a Hard Disk Drive
 |
View all HP Server tc3100 manuals
Add to My Manuals
Save this manual to your list of manuals |
Page 24 highlights
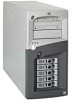
Chapter 3 Installing and Configuring Figure 3-6. Removing a Hard Disk Drive 6. Gently slide the new drive into the available opening until the eject mechanism clicks. 7. Connect the power and signal cable to the new drive. 8. Close the upper bezel and side panel, and replace the external cables and power cord. 9. Power up the server and return it to normal operation. NOTE If you will not be replacing the drive, replace the disk with a filler panel to ensure the integrity of the cooling system. Installing Optional SCSI Accessory Cable The optional SCSI accessory cable (P/N P1773A) is used to connect the optional tape drive, which will separate the slower tape drive from the faster Ultra-3 SCSI drives. Refer to Figure 3-7 when installing the optional SCSI accessory cable into the Channel A connector and cabling the existing cable and channel B cable to the SCSI disk drives. 18
-
 1
1 -
2
-
3
-
4
-
5
-
6
-
7
-
8
-
9
-
10
-
11
-
12
-
13
-
14
-
15
-
16
-
17
-
18
-
 19
19 -
 20
20 -
 21
21 -
 22
22 -
 23
23 -
 24
24 -
 25
25 -
 26
26 -
 27
27 -
 28
28 -
 29
29 -
30
-
31
-
32
-
33
-
34
-
35
-
36
-
37
-
38
-
39
-
40
-
41
-
42
-
43
-
44
-
45
-
46
-
47
-
48
-
49
-
50
-
51
-
52
-
53
-
54
-
55
-
56
-
57
-
58
-
59
-
60
-
61
-
62
-
63
-
64
-
65
-
66
-
67
-
68
-
69
-
70
-
71
-
72
-
73
-
74
-
75
-
76
-
77
-
78
-
79
-
80
-
81
-
82
-
83
-
84
-
85
-
86
-
87
-
88
-
89
-
90
-
91
-
92
-
93
-
94
-
95
-
96
-
97
-
98
-
99
-
100
-
101
-
102
-
103
-
104
-
105
-
106
-
107
-
108
-
109
-
110
-
111
 |
 |
