HP Server tc3100 hp server tc3100 operation and maintenance guide (English, v1 - Page 27
Removing Cold Swap Hard Drives, Removing Cold Swap Hard Drive
 |
View all HP Server tc3100 manuals
Add to My Manuals
Save this manual to your list of manuals |
Page 27 highlights
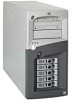
Chapter 3 Installing and Configuring Removing Cold Swap Hard Drives 1. If the server is operating, log off all users, back up files, and power down the server. 2. Disconnect the power cord and any external cables connected to the server. If necessary, label each one to expedite re-assembly. WARNING The power supply will continue to provide standby current to the HP Server until the power cord is disconnected. 3. Using both hands, grasp the ejector arms of the drive to be removed and press inward while pulling the drive out towards you. 4. Use your hand to support the bottom of the drive, while you slowly pull the drive straight out. See Figure 3-10. Do not allow the drive to fall. Figure 3-10. Removing Cold Swap Hard Drive 5. Place the drive in an electrostatic protected container. Do not stack drives. NOTE If you are not replacing the drive, place a filler panel in the drive slot. Operating the HP Server without filler panels in empty SCSI drive slots may cause the HP Server to suffer thermal damage. 21
-
 1
1 -
2
-
3
-
4
-
5
-
6
-
7
-
8
-
9
-
10
-
11
-
12
-
13
-
14
-
15
-
16
-
17
-
18
-
19
-
20
-
21
-
 22
22 -
 23
23 -
 24
24 -
 25
25 -
 26
26 -
 27
27 -
 28
28 -
 29
29 -
 30
30 -
 31
31 -
 32
32 -
33
-
34
-
35
-
36
-
37
-
38
-
39
-
40
-
41
-
42
-
43
-
44
-
45
-
46
-
47
-
48
-
49
-
50
-
51
-
52
-
53
-
54
-
55
-
56
-
57
-
58
-
59
-
60
-
61
-
62
-
63
-
64
-
65
-
66
-
67
-
68
-
69
-
70
-
71
-
72
-
73
-
74
-
75
-
76
-
77
-
78
-
79
-
80
-
81
-
82
-
83
-
84
-
85
-
86
-
87
-
88
-
89
-
90
-
91
-
92
-
93
-
94
-
95
-
96
-
97
-
98
-
99
-
100
-
101
-
102
-
103
-
104
-
105
-
106
-
107
-
108
-
109
-
110
-
111
 |
 |
