HP Server tc3100 hp server tc3100 operation and maintenance guide (English, v1 - Page 73
Clearing the BIOS Configuration, Configuration Switch Settings
 |
View all HP Server tc3100 manuals
Add to My Manuals
Save this manual to your list of manuals |
Page 73 highlights
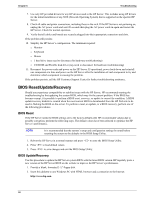
Chapter 6 Troubleshooting 3. Locate and download the latest HP Server BIOS to the PC's hard drive. Find the file that was downloaded and double-click on the file and follow the instructions to extract the file to the floppy disk. This downloaded BIOS on the diskette becomes the BIOS update diskette. 4. Boot the HP Server with the BIOS update diskette in the flexible disk drive. The BIOS Utility Update program will start and you will be prompted to update the system BIOS. 5. After the BIOS update is complete, remove the BIOS update diskette and then reboot the HP Server. 6. Press to enter the BIOS Setup Utility and make the necessary changes needed in the BIOS Setup Utility, press to save the changes and exit the utility. 7. Label, date, and save this flexible diskette for use as a BIOS Recovery diskette. NOTE If you do not have convenient access to the Internet, you can create a BIOS Update/Recovery diskette from the HP Navigator CD-ROM or the HP Startup CD-ROM. Please note that these CD-ROMS may not provide the most recent BIOS. To create the BIOS Update/Recovery diskette, run the Navigator or Startup CD-ROM on any Windows PC with an HTML browser and follow the menu instructions. Clearing the BIOS Configuration NOTE It is recommended that the system's setup and configuration settings be noted before clearing the BIOS configuration as this will reset all settings back to the default. You may need to clear the BIOS (CMOS) configuration if the configuration has become corrupt or if incorrect settings made in the Setup Utility have caused error messages to be unreadable. To clear the configuration: 1. Turn off power to the HP server and open the side panel. 2. Move switch 4 in the configuration switch on the system board (labeled "Clear CMOS") to the ON position. Configuration Switch Settings 3. Turn on the power to the HP server. A message displays indicating the configuration has been cleared. 4. Turn off power to the HP Server. 5. Return switch 4 on the system board to the OFF position. 6. Close the side panel. 7. Turn on the power to the HP server and the following message displays: 67
-
 1
1 -
2
-
3
-
4
-
5
-
6
-
7
-
8
-
9
-
10
-
11
-
12
-
13
-
14
-
15
-
16
-
17
-
18
-
19
-
20
-
21
-
22
-
23
-
24
-
25
-
26
-
27
-
28
-
29
-
30
-
31
-
32
-
33
-
34
-
35
-
36
-
37
-
38
-
39
-
40
-
41
-
42
-
43
-
44
-
45
-
46
-
47
-
48
-
49
-
50
-
51
-
52
-
53
-
54
-
55
-
56
-
57
-
58
-
59
-
60
-
61
-
62
-
63
-
64
-
65
-
66
-
67
-
 68
68 -
 69
69 -
 70
70 -
 71
71 -
 72
72 -
 73
73 -
 74
74 -
 75
75 -
 76
76 -
 77
77 -
 78
78 -
79
-
80
-
81
-
82
-
83
-
84
-
85
-
86
-
87
-
88
-
89
-
90
-
91
-
92
-
93
-
94
-
95
-
96
-
97
-
98
-
99
-
100
-
101
-
102
-
103
-
104
-
105
-
106
-
107
-
108
-
109
-
110
-
111
 |
 |
