HP Visualize b180L installing the hp Visualize workstation b132L/b160L to b180 - Page 22
Transfer the Power Supply from the Old Main Tray to, the New Main Tray
 |
View all HP Visualize b180L manuals
Add to My Manuals
Save this manual to your list of manuals |
Page 22 highlights
Transfer the Power Supply from the Old Main Tray to the New Main Tray Transfer the Power Supply from the Old Main Tray to the New Main Tray To remove the power supply from the old tray, perform the following: 1 Remove the two power supply retaining screws, as shown in Figure 15. Figure 13 CAUTION: Power Supply Retaining Screws Removing the Power Supply 2 Pull the power supply out of the side of the main tray, as shown in Figure 15. To avoid damage, be sure to use two hands to remove the power supply and pull it straight out. 3 To install the power supply into the new tray, slide the power supply into the chassis and tighten the two power supply retaining screws. 20
-
 1
1 -
2
-
3
-
4
-
5
-
6
-
7
-
8
-
9
-
10
-
11
-
12
-
13
-
14
-
15
-
16
-
 17
17 -
 18
18 -
 19
19 -
 20
20 -
 21
21 -
 22
22 -
 23
23 -
 24
24 -
 25
25 -
 26
26 -
 27
27 -
28
 |
 |
20
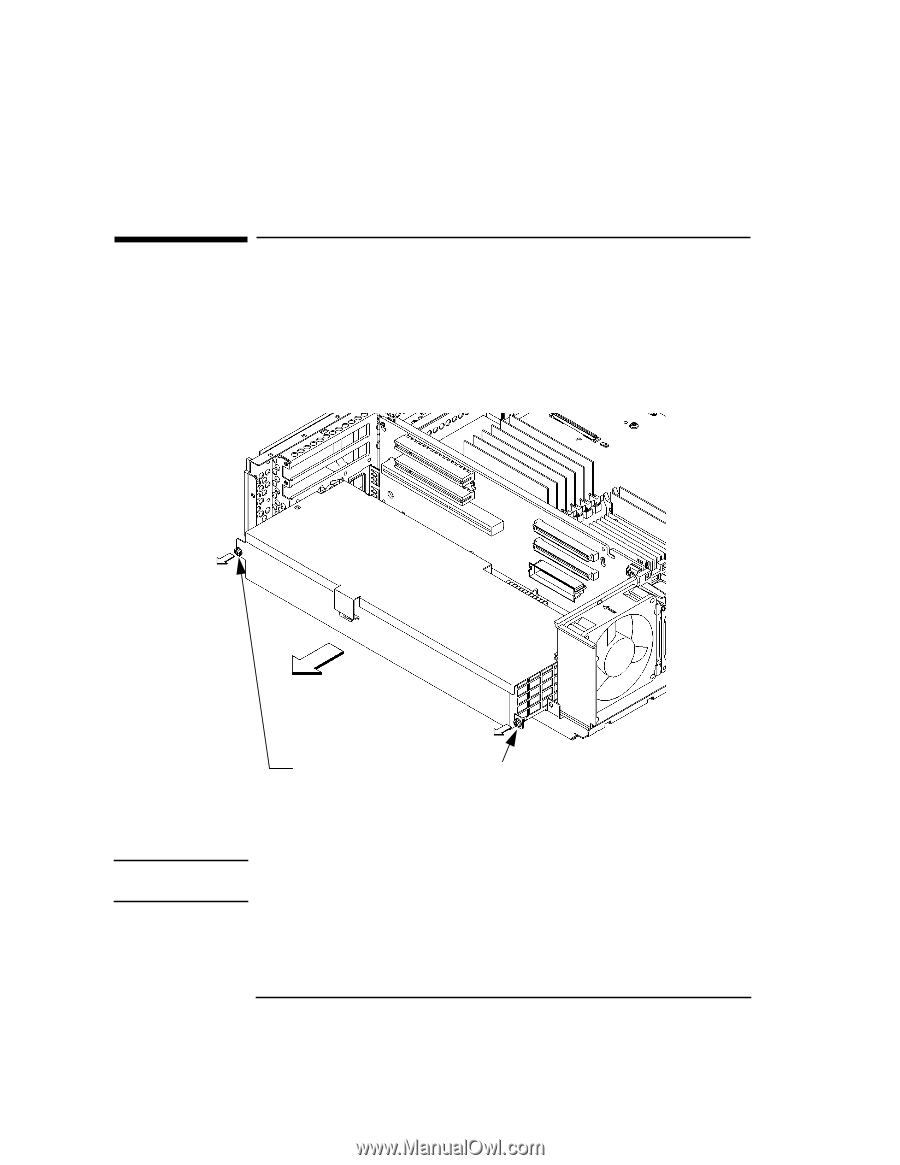
Transfer the Power Supply from the Old Main Tray to the New Main Tray
Transfer the Power Supply from the Old Main Tray to
the New Main Tray
To remove the power supply from the old tray, perform the following:
1
Remove the two power supply retaining screws, as shown in Figure 15.
Figure 13
Removing the Power Supply
2
Pull the power supply out of the side of the main tray, as shown in Figure 15.
CAUTION:
To avoid damage, be sure to use two hands to remove the power supply and
pull it straight out.
3
To install the power supply into the new tray, slide the power supply into the chas-
sis and tighten the two power supply retaining screws.
Power Supply Retaining Screws