HP Workstation xw6000 Adaptec SCSI RAID 2120S: Software User's Guide - Page 22
Creating Arrays, Ctrl+A, Array Configuration Utility, Left/Right, Insert, Delete, Enter
 |
View all HP Workstation xw6000 manuals
Add to My Manuals
Save this manual to your list of manuals |
Page 22 highlights
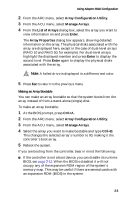
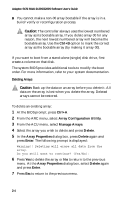
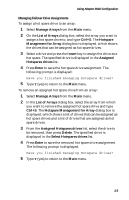
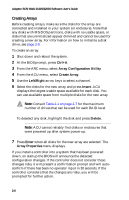
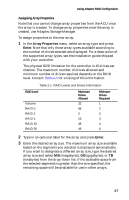
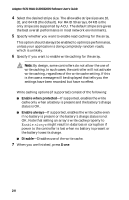
Adaptec SCSI RAID 2120S/2200S Software User's Guide Creating Arrays Before creating arrays, make sure the disks for the array are connected and installed in your system (or enclosure). Note that any disks with MS-DOS partitions, disks with no usable space, or disks that are uninitialized appear dimmed and cannot be used for creating a new array. For information on how to initialize a disk drive, see page 2-9. To create an array: 1 Shut down and reboot the system. 2 At the BIOS prompt, press Ctrl+A. 3 From the ARC menu, select Array Configuration Utility. 4 From the ACU menu, select Create Array. 5 Use the Left/Right arrow keys to select a channel. 6 Select the disks for the new array and press Insert. ACU displays the largest usable space available for each disk. You can use available space from multiple disks for the new array. Note: Consult Table 2-1 on page 2-7 for the maximum number of drives that can be used for each RAID level. To deselect any disk, highlight the disk and press Delete. Note: ACU cannot reliably find disks or enclosures that were powered up after system power-up. 7 Press Enter when all disks for the new array are selected. The Array Properties menu displays. If you install a controller into a system that has been powered down, on startup the BIOS will announce the detected configuration changes. If the controller does not consider these changes risky it will present a confirmation prompt and will autoconfirm if there has been no operator input in 30 seconds. If the controller considers that the changes are risky, you will be prompted for further action. 2-6
-
 1
1 -
2
-
3
-
4
-
5
-
6
-
7
-
8
-
9
-
10
-
11
-
12
-
13
-
14
-
15
-
16
-
 17
17 -
 18
18 -
 19
19 -
 20
20 -
 21
21 -
 22
22 -
 23
23 -
 24
24 -
 25
25 -
 26
26 -
 27
27 -
28
-
29
-
30
-
31
-
32
-
33
-
34
-
35
-
36
-
37
-
38
-
39
-
40
-
41
-
42
-
43
-
44
-
45
-
46
-
47
-
48
-
49
-
50
-
51
-
52
-
53
-
54
-
55
-
56
-
57
-
58
-
59
-
60
-
61
-
62
-
63
-
64
-
65
-
66
-
67
-
68
-
69
-
70
-
71
-
72
-
73
-
74
-
75
-
76
-
77
-
78
-
79
-
80
-
81
-
82
-
83
-
84
-
85
-
86
-
87
-
88
-
89
-
90
-
91
-
92
-
93
-
94
-
95
-
96
-
97
-
98
-
99
-
100
-
101
-
102
-
103
-
104
-
105
-
106
-
107
-
108
-
109
-
110
-
111
-
112
-
113
-
114
-
115
-
116
-
117
-
118
-
119
-
120
-
121
-
122
-
123
-
124
-
125
-
126
-
127
-
128
 |
 |
