HP Workstation xw6000 Adaptec SCSI RAID 2120S: Software User's Guide - Page 23
Assigning Array Properties, Array Properties, Enter
 |
View all HP Workstation xw6000 manuals
Add to My Manuals
Save this manual to your list of manuals |
Page 23 highlights
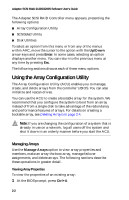
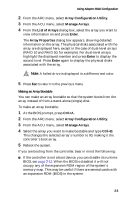
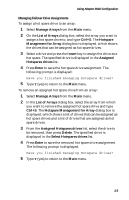
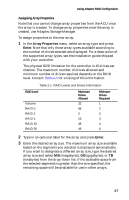
Using Adaptec RAID Configuration Assigning Array Properties Note that you cannot change array properties from the ACU once the array is created. To change array properties once the array is created, use Adaptec Storage Manager. To assign properties to the new array: 1 In the Array Properties menu, select an array type and press Enter. Note that only those array types available according to the number of drives selected are displayed. For a description of the supported array types, see the installation guide shipped with your controller. The physical SCSI limitation for the controller is 15 drives per channel. The maximum number of drives allowed and minimum number of drives required depends on the RAID level. Consult Table 2-1 for a listing of this information. Table 2-1 RAID Levels and Drives Information RAID Level Volume RAID 0 RAID 1 RAID 5 RAID 10 RAID 50 Maximum Drives Allowed 32 48 2 16 48 48 Minimum Drives Required 1 2 2 3 4 6 2 Type in an optional label for the array and press Enter. 3 Enter the desired array size. The maximum array size available based on the segments you selected is displayed automatically. If you want to designate a different array size, type the desired array size and select MB (megabytes), GB (gigabytes), or TB (terabytes) from the drop-down list. If the available space from the selected segments is greater than the size specified, the remaining space will be available for use in other arrays. 2-7
-
 1
1 -
2
-
3
-
4
-
5
-
6
-
7
-
8
-
9
-
10
-
11
-
12
-
13
-
14
-
15
-
16
-
17
-
 18
18 -
 19
19 -
 20
20 -
 21
21 -
 22
22 -
 23
23 -
 24
24 -
 25
25 -
 26
26 -
 27
27 -
 28
28 -
29
-
30
-
31
-
32
-
33
-
34
-
35
-
36
-
37
-
38
-
39
-
40
-
41
-
42
-
43
-
44
-
45
-
46
-
47
-
48
-
49
-
50
-
51
-
52
-
53
-
54
-
55
-
56
-
57
-
58
-
59
-
60
-
61
-
62
-
63
-
64
-
65
-
66
-
67
-
68
-
69
-
70
-
71
-
72
-
73
-
74
-
75
-
76
-
77
-
78
-
79
-
80
-
81
-
82
-
83
-
84
-
85
-
86
-
87
-
88
-
89
-
90
-
91
-
92
-
93
-
94
-
95
-
96
-
97
-
98
-
99
-
100
-
101
-
102
-
103
-
104
-
105
-
106
-
107
-
108
-
109
-
110
-
111
-
112
-
113
-
114
-
115
-
116
-
117
-
118
-
119
-
120
-
121
-
122
-
123
-
124
-
125
-
126
-
127
-
128
 |
 |
