HP Xw460c HP ProLiant xw460c Blade Workstation - Administrator's Guide for Lin - Page 21
Powering on the blade workstation
 |
View all HP Xw460c manuals
Add to My Manuals
Save this manual to your list of manuals |
Page 21 highlights
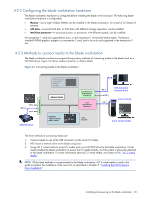
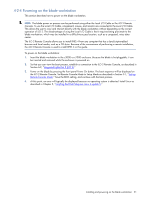
4-2-4 Powering on the blade workstation This section describes how to power on the blade workstation. NOTE: The blade power on process can be performed using either the Local I/O Cable or the iLO 2 Remote Console. To use the Local I/O Cable, a keyboard, mouse, and monitor are connected to the Local I/O Cable. This allows the user to view and interact directly with the blade workstation without depending on the correct operation of iLO 2. The disadvantage of using the Local I/O Cable is that it requires being proximate to the blade workstation, which may be installed in a difficult-to-access location, such as a congested, noisy data center. The iLO 2 Remote Console allows you to install RHEL 4 from any computer that has a JavaScript-enabled browser and local media, such as a CD drive. Because of the convenience of performing a remote installation, the iLO 2 Remote Console is used to install RHEL 4 in this guide. To power on the blade workstation: 1. Insert the blade workstation in the c3000 or c7000 enclosure. Because the blade is hot-pluggable, it can be inserted and removed while the enclosure is powered on. 2. So that you can view the boot process, establish a connection to the iLO 2 Remote Console, as described in Section 6-2, "Integrated Lights-Out 2 (iLO 2)." 3. Power on the blade by pressing the front panel Power On button. The boot sequence will be displayed on the iLO 2 Remote Console. Set Remote Console Mode to Setup Mode as described in Section 3-1, "Setting Remote Console Mode." Save the BIOS setting, and continue with the boot process. 4. At this point, an error will typically be displayed because no operating system is detected. Install Linux as described in Chapter 5, "Installing Red Hat Enterprise Linux 4 update 5." Installing and powering on the blade workstation 21
-
 1
1 -
2
-
3
-
4
-
5
-
6
-
7
-
8
-
9
-
10
-
11
-
12
-
13
-
14
-
15
-
 16
16 -
 17
17 -
 18
18 -
 19
19 -
 20
20 -
 21
21 -
 22
22 -
 23
23 -
 24
24 -
 25
25 -
 26
26 -
27
-
28
-
29
-
30
-
31
-
32
-
33
-
34
-
35
-
36
-
37
-
38
-
39
-
40
-
41
-
42
-
43
-
44
-
45
-
46
-
47
-
48
-
49
-
50
-
51
-
52
-
53
-
54
-
55
-
56
-
57
 |
 |
