Figures
4
Index
Figures
Figure 1-1
Simplified HP Blade Workstation Solution documentation hierarchy
....................................................
7
Figure 1-2
Log In and Store links
....................................................................................................................
8
Figure 1-3
The workstation versions of Red Hat Enterprise Linux Desktop
.............................................................
8
Figure 1-4
Link to the software download page
................................................................................................
9
Figure 1-5
Web page to download the five RHEL 4 ISO images
........................................................................
9
Figure 3-1
Video subsystem architecture
.......................................................................................................
12
Figure 3-2
Viewing and setting Remote Console Mode
...................................................................................
13
Figure 3-3
Admin Mode
.............................................................................................................................
14
Figure 3-4
Setup Mode
...............................................................................................................................
15
Figure 3-5
User Mode
................................................................................................................................
16
Figure 4-1
Network devices and Onboard Administrator modules in the c7000 enclosure
..................................
19
Figure 4-2
Connecting media to the blade workstation
...................................................................................
20
Figure 5-1
iLO 2 login page
........................................................................................................................
23
Figure 5-2
iLO 2 Status Summary page
.........................................................................................................
24
Figure 5-3
Dialogs displayed during download of the Virtual Media Applet
......................................................
24
Figure 5-4
Mounting of the Local Computer CD drive (D:) to the blade workstation
............................................
25
Figure 5-5
The D: drive is now mounted to the blade workstation
....................................................................
25
Figure 5-6
Disabling the high performance mouse
..........................................................................................
26
Figure 5-7
Select Integrated Remote Console to create the Linux installation window
...........................................
26
Figure 5-8
The Integrated Remote Console window
........................................................................................
27
Figure 5-9
Virtual Power Button menu
...........................................................................................................
27
Figure 5-10
Blade workstation boot screen as displayed in the Integrated Remote Console window
.....................
28
Figure 5-11
Switching from User Mode to Setup Mode
...................................................................................
28
Figure 5-12
Initial RHEL 4 screen
.................................................................................................................
29
Figure 5-13
The CD media test is skipped in this installation
............................................................................
30
Figure 5-14
Red Hat welcome screen
...........................................................................................................
30
Figure 5-15
Network configuration
..............................................................................................................
31
Figure 5-16
No firewall is enabled
...............................................................................................................
31
Figure 5-17
Selection of Everything
..............................................................................................................
32
Figure 5-18
CDs required for this installation
................................................................................................
32
Figure 5-19
Installation complete screen
.......................................................................................................
33
Figure 5-20
Linux boot screen
......................................................................................................................
34
Figure 5-21
Red Hat welcome screen
...........................................................................................................
34
Figure 5-22
Select the radio button below to defer registration
........................................................................
35
Figure 5-23
Deferral of registration
..............................................................................................................
35
Figure 5-24
Login screen
............................................................................................................................
36
Figure 5-25
The Red Hat Linux desktop
.........................................................................................................
36
Figure 5-26
Operating system selection
........................................................................................................
37
Figure 5-27
Copying of the mouse driver to the /
tmp
folder
............................................................................
38
Figure 5-28
Executing
autorun.sh
............................................................................................................
39
Figure 5-29
Installation of the NVIDIA driver
................................................................................................
39
Figure 5-30
Enabling of the iLO 2 Remote Console
........................................................................................
40
Figure 5-31
Addition of a line to the rgsenderconfig file
..................................................................................
40
Figure 5-32
eth0 is enabled
........................................................................................................................
41
Figure 5-33
eth1 is enabled
........................................................................................................................
41
Figure 5-34
Adding a hostname to the
/etc/hosts
file
................................................................................
42
Figure 5-35
The ATI video controller and NVIDIA graphics adapter should both be displayed
. ............................
42
Figure 5-36
RGS Sender installation files
......................................................................................................
43
Figure 5-37
Using SSH to establish a connection to the blade workstation
.........................................................
43
Figure 5-38
The RGS Sender is now running
.................................................................................................
44

 1
1 2
2 3
3 4
4 5
5 6
6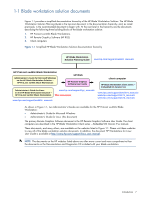 7
7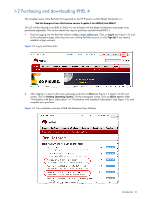 8
8 9
9 10
10

