HP Z6100 HP Designjet Z6100 Printer Series - User's Guide - Page 216
Task 4: Handle print jobs, Task 5: Adjust printed images
 |
UPC - 882780989535
View all HP Z6100 manuals
Add to My Manuals
Save this manual to your list of manuals |
Page 216 highlights
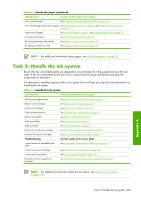
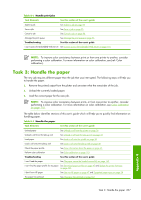
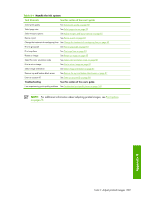
Task 4: Handle print jobs After verifying ink consumables and paper levels, you can send the job to the printer. On the screen preview, make adjustments for paper type, print size, number of copies and nesting as necessary. You can then move the job to the RIP queue. The table below identifies sections of this user's guide which will help you to quickly find information on handling print jobs. Table A-3 Handle print jobs Task Elements See this section of the user's guide Submit a job See Submit a job on page 94 Save a job See Save a job on page 95 Check ink and paper usage for a job Cancel a job See Check ink and paper usage for a job on page 101 See Cancel a job on page 96 Manage the print queue See Manage the print queue on page 96 Troubleshooting See this section of the user's guide I can't access the Embedded Web Server See Cannot access the Embedded Web Server on page 174 NOTE: To improve color consistency between prints or from one printer to another, consider performing a color calibration. For more information on color calibration, see Color calibration on page 110. Task 5: Adjust printed images Check the quality of the prints. The table below identifies sections of this user's guide which will help you to quickly find information on adjusting printed images. Table A-4 Handle the ink system Task Elements See this section of the user's guide Select print quality See Select print quality on page 80 Select page size See Select page size on page 80 Select margins options See Adjust margins and layout options on page 82 Resize a print See Resize a print on page 83 Change the treatment of overlapping lines See Change the treatment of overlapping lines on page 89 Print in grayscale See Print in grayscale on page 93 Print crop lines See Print crop lines on page 84 Rotate an image See Rotate an image on page 85 Select the color emulation mode See Select color emulation mode on page 88 Print a mirror image See Print a mirror image on page 87 Select image orientation See Select image orientation on page 87 Remove top and bottom blank areas See Remove the top and bottom blank areas on page 87 Enter an account ID See Enter an account ID on page 88 Appendix A 204 Appendix A Overnight job scenario
-
 1
1 -
2
-
3
-
4
-
5
-
6
-
7
-
8
-
9
-
10
-
11
-
12
-
13
-
14
-
15
-
16
-
17
-
18
-
19
-
20
-
21
-
22
-
23
-
24
-
25
-
26
-
27
-
28
-
29
-
30
-
31
-
32
-
33
-
34
-
35
-
36
-
37
-
38
-
39
-
40
-
41
-
42
-
43
-
44
-
45
-
46
-
47
-
48
-
49
-
50
-
51
-
52
-
53
-
54
-
55
-
56
-
57
-
58
-
59
-
60
-
61
-
62
-
63
-
64
-
65
-
66
-
67
-
68
-
69
-
70
-
71
-
72
-
73
-
74
-
75
-
76
-
77
-
78
-
79
-
80
-
81
-
82
-
83
-
84
-
85
-
86
-
87
-
88
-
89
-
90
-
91
-
92
-
93
-
94
-
95
-
96
-
97
-
98
-
99
-
100
-
101
-
102
-
103
-
104
-
105
-
106
-
107
-
108
-
109
-
110
-
111
-
112
-
113
-
114
-
115
-
116
-
117
-
118
-
119
-
120
-
121
-
122
-
123
-
124
-
125
-
126
-
127
-
128
-
129
-
130
-
131
-
132
-
133
-
134
-
135
-
136
-
137
-
138
-
139
-
140
-
141
-
142
-
143
-
144
-
145
-
146
-
147
-
148
-
149
-
150
-
151
-
152
-
153
-
154
-
155
-
156
-
157
-
158
-
159
-
160
-
161
-
162
-
163
-
164
-
165
-
166
-
167
-
168
-
169
-
170
-
171
-
172
-
173
-
174
-
175
-
176
-
177
-
178
-
179
-
180
-
181
-
182
-
183
-
184
-
185
-
186
-
187
-
188
-
189
-
190
-
191
-
192
-
193
-
194
-
195
-
196
-
197
-
198
-
199
-
200
-
201
-
202
-
203
-
204
-
205
-
206
-
207
-
208
-
209
-
210
-
 211
211 -
 212
212 -
 213
213 -
 214
214 -
 215
215 -
 216
216 -
 217
217 -
 218
218 -
 219
219 -
 220
220 -
 221
221 -
222
-
223
-
224
-
225
-
226
-
227
-
228
-
229
-
230
-
231
-
232
 |
 |
