HP bc1000 Setup & Installation Guide - Page 72
Flashing the Blade PC ROM, Upgrading the Blade PC ROM Using ROMPaq Utility
 |
View all HP bc1000 manuals
Add to My Manuals
Save this manual to your list of manuals |
Page 72 highlights
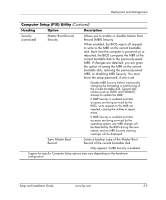
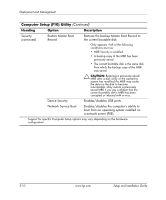
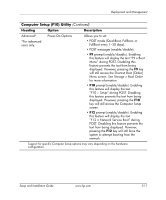
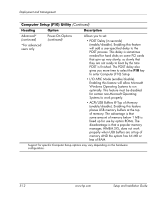
Deployment and Management Restoring the configuration setting can also be performed from the operating system using System Software Manager (SSM). For more information, refer to the following website: www.hp.com/go/ssm Flashing the Blade PC ROM When you flash the blade ROM, ROMPaq writes over the older ROM and saves the current ROM as a backup, enabling you to switch easily to the backup ROM version. This feature protects your previous ROM version, even if you experience a power failure while flashing the ROM. There are two methods for flashing your ROM: ■ Upgrading the Blade PC ROM using ROMPaq Utility ■ Remote ROM flash Upgrading the Blade PC ROM Using ROMPaq Utility Use Blade PC ROMPaq utilities to upgrade your system BIOS. ✎ The following steps also apply when recovering the system if the system enters Boot Block mode due to a ROM flash failure. ✎ For information on creating a bootable Drive Key, refer to the following website: http://wwss1pro.compaq.com/support/reference_library/viewdocum ent.asp?source=338111.xml&dt=21 To use the ROMPaq Utility: 1. Download the latest version of the system BIOS for the Blade PC onto a USB Drive Key. The latest system BIOS is available at: www.hp.com 2. Power down the blade. See the "Powering Down a Blade PC" section in Chapter 4. 3. Remove the Blade PC. See the "Removing a Blade PC" section in Chapter 4. 4. Install the optional graphics diagnostic card on the Blade PC. 5. Install the Blade PC in the enclosure. 5-14 www.hp.com Setup and Installation Guide
-
 1
1 -
2
-
3
-
4
-
5
-
6
-
7
-
8
-
9
-
10
-
11
-
12
-
13
-
14
-
15
-
16
-
17
-
18
-
19
-
20
-
21
-
22
-
23
-
24
-
25
-
26
-
27
-
28
-
29
-
30
-
31
-
32
-
33
-
34
-
35
-
36
-
37
-
38
-
39
-
40
-
41
-
42
-
43
-
44
-
45
-
46
-
47
-
48
-
49
-
50
-
51
-
52
-
53
-
54
-
55
-
56
-
57
-
58
-
59
-
60
-
61
-
62
-
63
-
64
-
65
-
66
-
 67
67 -
 68
68 -
 69
69 -
 70
70 -
 71
71 -
 72
72 -
 73
73 -
 74
74 -
 75
75 -
 76
76 -
 77
77 -
78
-
79
-
80
-
81
-
82
-
83
-
84
-
85
-
86
-
87
-
88
-
89
-
90
-
91
-
92
-
93
-
94
-
95
-
96
-
97
-
98
-
99
-
100
-
101
-
102
-
103
-
104
-
105
-
106
-
107
-
108
-
109
-
110
-
111
-
112
-
113
-
114
-
115
-
116
-
117
-
118
-
119
-
120
-
121
-
122
-
123
-
124
-
125
-
126
-
127
-
128
-
129
-
130
-
131
-
132
-
133
-
134
-
135
-
136
-
137
-
138
-
139
-
140
-
141
-
142
-
143
-
144
-
145
-
146
 |
 |