Huawei Mate 9 Pro User Guide - Page 8
Unboxing, Phone
 |
View all Huawei Mate 9 Pro manuals
Add to My Manuals
Save this manual to your list of manuals |
Page 8 highlights
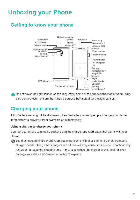
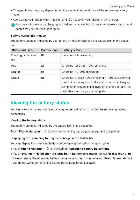
Unboxing your Phone Getting to know your phone Secondary microphone I Intoned aerispDual.tope flash Dual-lens era Lasercsaemnear USB-C port Optical proximity sensor Status i indiemar „ . H I - Earpiece -II Secondary microptione-2 Ambient Itght sensor Front camera 1- Volume button Primary microphone I Headset tack Povier button Len navigation r key Primary navigation Refer Fingeeptint ' canner Right navigation key Speaker Primary microphone 2 Do not cover the light sensor as this may affect some of the phone's functions. When using a screen protector ensure that it has a purpose-built cutout for the light sensor Charging your phone A low battery warning will b.e displayed when the battery is nearly empty Charge your phone immediately to prevent it from switching off automatically Using a charger to charge your phone Connect your phone to a mains socket using the charger and USB cable that came with your phone. 0 You must use the charger and USB cable that came with your phone to benefit from .quick charge speeds Using other chargers or USB cables may cause your phone to continuously restart or increase the charging time It may also cause the charger to overheat, or even damage your device or cause the "attery to explode.
-
 1
1 -
2
-
 3
3 -
 4
4 -
 5
5 -
 6
6 -
 7
7 -
 8
8 -
 9
9 -
 10
10 -
 11
11 -
 12
12 -
 13
13 -
14
-
15
-
16
-
17
-
18
-
19
-
20
-
21
-
22
-
23
-
24
-
25
-
26
-
27
-
28
-
29
-
30
-
31
-
32
-
33
-
34
-
35
-
36
-
37
-
38
-
39
-
40
-
41
-
42
-
43
-
44
-
45
-
46
-
47
-
48
-
49
-
50
-
51
-
52
-
53
-
54
-
55
-
56
-
57
-
58
-
59
-
60
-
61
-
62
-
63
-
64
-
65
-
66
-
67
-
68
-
69
-
70
-
71
-
72
-
73
-
74
-
75
-
76
-
77
-
78
-
79
-
80
-
81
-
82
-
83
-
84
-
85
-
86
-
87
-
88
-
89
-
90
-
91
-
92
-
93
-
94
-
95
-
96
-
97
-
98
-
99
-
100
-
101
-
102
-
103
-
104
-
105
-
106
-
107
-
108
-
109
-
110
-
111
-
112
-
113
-
114
-
115
-
116
-
117
-
118
-
119
-
120
-
121
-
122
-
123
-
124
-
125
-
126
-
127
-
128
-
129
-
130
-
131
-
132
-
133
-
134
-
135
-
136
-
137
-
138
-
139
-
140
-
141
-
142
-
143
-
144
-
145
-
146
-
147
-
148
-
149
-
150
-
151
-
152
-
153
-
154
-
155
-
156
-
157
-
158
-
159
-
160
-
161
-
162
-
163
-
164
-
165
-
166
-
167
-
168
-
169
-
170
-
171
-
172
-
173
-
174
-
175
-
176
-
177
-
178
-
179
-
180
-
181
-
182
-
183
-
184
-
185
-
186
-
187
-
188
-
189
-
190
-
191
-
192
-
193
-
194
-
195
-
196
-
197
-
198
 |
 |
