IBM 72332MU Installation Guide - Page 73
Microprocessor problems, Monitor problems
 |
UPC - 883436084673
View all IBM 72332MU manuals
Add to My Manuals
Save this manual to your list of manuals |
Page 73 highlights
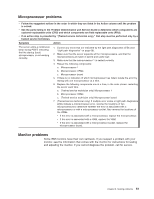
Microprocessor problems v Follow the suggested actions in the order in which they are listed in the Action column until the problem is solved. v See the parts listing in the Problem Determination and Service Guide to determine which components are customer replaceable units (CRU) and which components are field replaceable units (FRU). v If an action step is preceded by "(Trained service technician only)," that step must be performed only by a trained service technician. Symptom Action The server emits a continuous beep during POST, indicating that the startup (boot) microprocessor is not working correctly. 1. Correct any errors that are indicated by the light path diagnostics LEDs (see "Light path diagnostics" on page 68). 2. Make sure that the server supports all the microprocessors, and that the microprocessors all match in speed and cache size. 3. Make sure that the microprocessor 1 is seated correctly. 4. Reseat the following components: a. Microprocessor 1 b. Microprocessor VRMs c. Microprocessor board 5. If there is no indication of which microprocessor has failed, isolate the error by testing with one microprocessor at a time. 6. Replace the following components one at a time, in the order shown, restarting the server each time. a. (Trained service technician only) Microprocessor 1 b. Microprocessor VRMs c. (Trained service technician only) Microprocessor board 7. (Trained service technician only) If multiple error codes or light path diagnostics LEDs indicate a microprocessor error, reverse the locations of two microprocessors to determine whether the error is associated with a microprocessor or with a microprocessor socket. Also reverse the locations of the VRMs. v If the error is associated with a microprocessor, replace the microprocessor. v If the error is associated with a VRM, replace the VRM. v If the error is associated with a microprocessor socket, replace the microprocessor board. Monitor problems Some IBM monitors have their own self-tests. If you suspect a problem with your monitor, see the information that comes with the monitor for instructions for testing and adjusting the monitor. If you cannot diagnose the problem, call for service. Chapter 6. Solving problems 61
-
 1
1 -
2
-
3
-
4
-
5
-
6
-
7
-
8
-
9
-
10
-
11
-
12
-
13
-
14
-
15
-
16
-
17
-
18
-
19
-
20
-
21
-
22
-
23
-
24
-
25
-
26
-
27
-
28
-
29
-
30
-
31
-
32
-
33
-
34
-
35
-
36
-
37
-
38
-
39
-
40
-
41
-
42
-
43
-
44
-
45
-
46
-
47
-
48
-
49
-
50
-
51
-
52
-
53
-
54
-
55
-
56
-
57
-
58
-
59
-
60
-
61
-
62
-
63
-
64
-
65
-
66
-
67
-
 68
68 -
 69
69 -
 70
70 -
 71
71 -
 72
72 -
 73
73 -
 74
74 -
 75
75 -
 76
76 -
 77
77 -
 78
78 -
79
-
80
-
81
-
82
-
83
-
84
-
85
-
86
-
87
-
88
-
89
-
90
-
91
-
92
-
93
-
94
-
95
-
96
-
97
-
98
-
99
-
100
-
101
-
102
 |
 |
