Intel S5500BC User Guide - Page 32
Optional Hardware - which one raid controller
 |
UPC - 735858208109
View all Intel S5500BC manuals
Add to My Manuals
Save this manual to your list of manuals |
Page 32 highlights
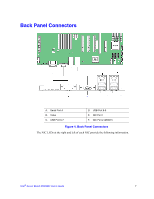
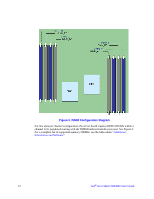
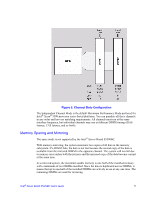
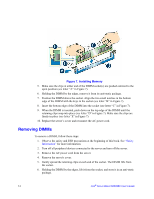
See the Intel® Server Board S5500BC Technical Product Specification for additional information regarding the memory sub-system. Power Supply A minimum of 400 W is required. Your supply must provide a minimum of 3.5 A of 5 V standby current or the board will not boot. Optional Hardware Intel® RAID Activation Key If RAID 5 is needed, you can install the optional Intel® RAID Activation Key AXXRAKSW5. To enable RAID 5, this activation key is placed on the SATA Key connector located on the right side of the server board (see Figure 2). For information on how to install the Intel® RAID Activation Key AXXRAKSW5 accessory to enable RAID 5, see the documentation included with the accessory kit. Hard Disk Drives The server board provides six SATA ports. The six SATA ports are near the rear left side of the server board. See the documentation included with your server chassis for additional drive information and drive installation instructions. Intel® Remote Management Module 3 The Intel® Server Board S5500BC provides a connector to support an Intel® Remote Management Module 3 card. The RMM3 card provides the Integrated BMC with an additional network interface. The dedicated interface uses a separate LAN channel. These components provide a way to view and operate the server remotely in real time. Keyboard, video, and mouse control (KVM) is redirected to a managing system; this provides remote control of the server. USB media redirection allows you to use a USB device anywhere on the network as if it was installed on the managed server. For installation instructions on installing the Intel® Remote Management Module 3, see the instructions provided with the module. 12 Intel® Server Board S5500BC User's Guide
-
 1
1 -
2
-
3
-
4
-
5
-
6
-
7
-
8
-
9
-
10
-
11
-
12
-
13
-
14
-
15
-
16
-
17
-
18
-
19
-
20
-
21
-
22
-
23
-
24
-
25
-
26
-
 27
27 -
 28
28 -
 29
29 -
 30
30 -
 31
31 -
 32
32 -
 33
33 -
 34
34 -
 35
35 -
 36
36 -
 37
37 -
38
-
39
-
40
-
41
-
42
-
43
-
44
-
45
-
46
-
47
-
48
-
49
-
50
-
51
-
52
-
53
-
54
-
55
-
56
-
57
-
58
-
59
-
60
-
61
-
62
-
63
-
64
-
65
-
66
-
67
-
68
-
69
-
70
-
71
-
72
-
73
-
74
-
75
-
76
-
77
-
78
-
79
-
80
-
81
-
82
-
83
-
84
-
85
-
86
 |
 |
