Intel S5500BC User Guide - Page 39
Installing the Processor
 |
UPC - 735858208109
View all Intel S5500BC manuals
Add to My Manuals
Save this manual to your list of manuals |
Page 39 highlights
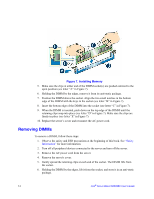
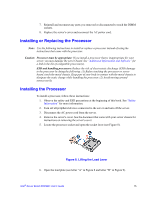
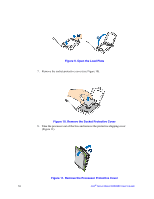
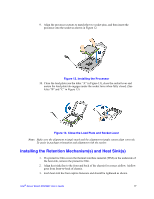
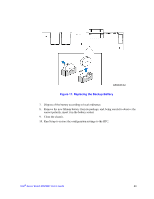
6. Loosen the four captive screws on the corners of the heat sink. 7. Twist the heat sink slightly to break the seal between the heat sink and the processor. 8. Lift the heat sink from the processor. If it does not pull up easily, twist the heat sink again. Do not force the heat sink from the processor-doing so could damage the processor. 9. Lift the processor lever. 10. Raise the CPU load plate. 11. Remove the processor. 12. If installing a replacement processor, see "Installing the Processor". Otherwise, install the protective socket cover over the empty processor socket and reinstall the chassis cover. Intel® Server Board S5500BC User's Guide 19
-
 1
1 -
2
-
3
-
4
-
5
-
6
-
7
-
8
-
9
-
10
-
11
-
12
-
13
-
14
-
15
-
16
-
17
-
18
-
19
-
20
-
21
-
22
-
23
-
24
-
25
-
26
-
27
-
28
-
29
-
30
-
31
-
32
-
33
-
 34
34 -
 35
35 -
 36
36 -
 37
37 -
 38
38 -
 39
39 -
 40
40 -
 41
41 -
 42
42 -
 43
43 -
 44
44 -
45
-
46
-
47
-
48
-
49
-
50
-
51
-
52
-
53
-
54
-
55
-
56
-
57
-
58
-
59
-
60
-
61
-
62
-
63
-
64
-
65
-
66
-
67
-
68
-
69
-
70
-
71
-
72
-
73
-
74
-
75
-
76
-
77
-
78
-
79
-
80
-
81
-
82
-
83
-
84
-
85
-
86
 |
 |

Intel
®
Server Board S5500BC User’s Guide
19
6.
Loosen the four captive screws on the corners of the heat sink.
7.
Twist the heat sink slightly to break the seal between the heat sink and the
processor.
8.
Lift the heat sink from the processor. If it does not pull up easily, twist the heat sink
again. Do not force the heat sink from the processor—doing so could damage the
processor.
9.
Lift the processor lever.
10.
Raise the CPU load plate.
11.
Remove the processor.
12.
If installing a replacement processor, see
“Installing the Processor”
. Otherwise,
install the protective socket cover over the empty processor socket and reinstall the
chassis cover.