Intel S5500BC User Guide - Page 48
Recovering the BIOS - review
 |
UPC - 735858208109
View all Intel S5500BC manuals
Add to My Manuals
Save this manual to your list of manuals |
Page 48 highlights
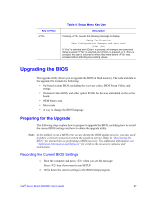
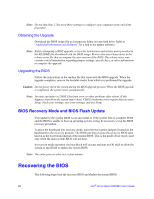
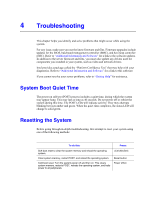
Note: Do not skip Step 2. You need these settings to configure your computer at the end of the procedure. Obtaining the Upgrade Download the BIOS image file to a temporary folder on your hard drive. Refer to "Additional Information and Software" for a link to the update software. Note: Before attempting a BIOS upgrade, review the instructions and release notes provided in the README file distributed with the BIOS image. Review also any release notes in the release notes file that accompany the new version of the BIOS. The release notes may contain critical information regarding jumper settings, specific fixes, or other information to complete the upgrade. Upgrading the BIOS Follow the instructions in the readme file that came with the BIOS upgrade. When the upgrade completes, remove the bootable media from which you performed the upgrade. Caution: Do not power down the system during the BIOS upgrade process! When the BIOS upgrade is completed, the system resets automatically. Note: You may encounter a CMOS Checksum error or other problems after reboot. If this happens, shut down the system and re-boot. CMOS checksum errors require that you enter Setup, check your settings, save your settings, and exit Setup. BIOS Recovery Mode and BIOS Flash Update If an update to the system BIOS is not successful or if the system fails to complete POST and the BIOS is unable to boot an operating system, it may be necessary to run the BIOS recovery procedure. To place the baseboard into recovery mode, move the boot option jumper (located on the baseboard) to the recovery position. The BIOS can then execute the recovery BIOS (also known as the boot block) instead of the normal BIOS. This is the mode of last resort, used only when the main system BIOS will not boot. In recovery mode operation, the boot block will execute and start an EFI shell to allow the system to run iFlash to update the system BIOS. Note: The entire process takes two to four minutes. Recovering the BIOS The following steps boot the recovery BIOS and flashes the normal BIOS: 28 Intel® Server Board S5500BC User's Guide
-
 1
1 -
2
-
3
-
4
-
5
-
6
-
7
-
8
-
9
-
10
-
11
-
12
-
13
-
14
-
15
-
16
-
17
-
18
-
19
-
20
-
21
-
22
-
23
-
24
-
25
-
26
-
27
-
28
-
29
-
30
-
31
-
32
-
33
-
34
-
35
-
36
-
37
-
38
-
39
-
40
-
41
-
42
-
 43
43 -
 44
44 -
 45
45 -
 46
46 -
 47
47 -
 48
48 -
 49
49 -
 50
50 -
 51
51 -
 52
52 -
 53
53 -
54
-
55
-
56
-
57
-
58
-
59
-
60
-
61
-
62
-
63
-
64
-
65
-
66
-
67
-
68
-
69
-
70
-
71
-
72
-
73
-
74
-
75
-
76
-
77
-
78
-
79
-
80
-
81
-
82
-
83
-
84
-
85
-
86
 |
 |
