Intel SE7505VB2 Product Specification - Page 89
Creating a Bootable Diskette, Creating the BIOS Upgrade Diskette, Upgrading the BIOS - server board manual
 |
View all Intel SE7505VB2 manuals
Add to My Manuals
Save this manual to your list of manuals |
Page 89 highlights
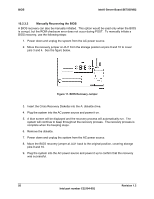
Intel® Server Board SE7505VB2 BIOS 10.2.1.3 Creating a Bootable Diskette 1. Use a DOS system to create the diskette. 2. Insert a diskette in diskette drive A. 3. At the C:\ prompt, for an unformatted diskette, type: format a:/s or, for a diskette that has already been formatted, type: sys a: 4. Press . 10.2.1.4 Creating the BIOS Upgrade Diskette The BIOS upgrade file is a compressed self-extracting archive that contains the files you need to upgrade the BIOS. 1. Download the BIOS image file to a temporary folder on your hard drive. The image is available from http://support.intel.com/support/motherboards/server/SE7505VB2 2. Execute the BIOS.EXE file to extract the update files from the image file. 3. Insert the bootable diskette you created in the steps above into the diskette drive. 4. Copy the BIOS update files from the temporary folder onto the bootable diskette. 10.2.2 Upgrading the BIOS Note: Make sure to read your BIOS release notes for any specific instructions on updating the BIOS (i.e. special jumper settings). 1. Place the bootable diskette containing the BIOS update files into the diskette drive of your system. Boot the system with the diskette in the drive. 2. A menu will appear with two options. Use option 1 to automatically update the system BIOS (See step 3). Use option 2 to manually update the system BIOS and the User Binary (See step 4). 3. If you selected option 1, to automatically update the system BIOS: The system will execute the Phlash update utility and update the BIOS. When the update is complete, the utility will display a green box with a message that says "Completed Successfully." The system will then reboot. Skip to step 5. Revision 1.2 89 Intel part number C32194-002
-
 1
1 -
2
-
3
-
4
-
5
-
6
-
7
-
8
-
9
-
10
-
11
-
12
-
13
-
14
-
15
-
16
-
17
-
18
-
19
-
20
-
21
-
22
-
23
-
24
-
25
-
26
-
27
-
28
-
29
-
30
-
31
-
32
-
33
-
34
-
35
-
36
-
37
-
38
-
39
-
40
-
41
-
42
-
43
-
44
-
45
-
46
-
47
-
48
-
49
-
50
-
51
-
52
-
53
-
54
-
55
-
56
-
57
-
58
-
59
-
60
-
61
-
62
-
63
-
64
-
65
-
66
-
67
-
68
-
69
-
70
-
71
-
72
-
73
-
74
-
75
-
76
-
77
-
78
-
79
-
80
-
81
-
82
-
83
-
 84
84 -
 85
85 -
 86
86 -
 87
87 -
 88
88 -
 89
89 -
 90
90 -
 91
91 -
 92
92 -
 93
93 -
 94
94 -
95
-
96
-
97
-
98
-
99
-
100
-
101
-
102
-
103
-
104
-
105
-
106
-
107
-
108
 |
 |