Invacare M61 Owners Manual - Page 44
ASBA Seat
 |
View all Invacare M61 manuals
Add to My Manuals
Save this manual to your list of manuals |
Page 44 highlights
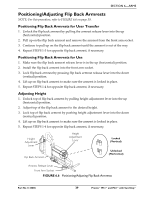
SECTION 7-SEAT ASBA Seat NOTE: For this procedure, refer to FIGURE 7.6. NOTE: This procedure is for Adjustable Seat Back Angle (ASBA) seats only. 1. Remove the seat cushion from the seat pan. 2. Move the flip back armrests out of the way. Refer to Positioning/Adjusting Flip Back Armrests on page 50. 3. Remove the two mounting screws, quick release pin tabs, spacers, and locknuts that secure the seat pan and seat positioning straps to the seat frame. 4. Remove the two halves of the seat positioning strap from the rear seat frame. 5. Reposition the two new seat positioning strap halves underneath seat rails. 6. Reinstall the two mounting screws, quick release pin tabs, spacers, and locknuts that secure the seat pan and seat positioning straps to the seat frame and torque to 75 inch‐ pounds. 7. Reinstall the seat cushion onto the seat pan. Mounting Screw Rear of Seat Frame Seat Pan Seat Positioning Strap Front of Seat Frame Quick Release Pin Tab Seat Rail Spacer Locknut FIGURE 7.6 Replacing the Seat Positioning Strap - ASBA Seat Pronto® M51™and M61™with SureStep® 44 Part No 1125085
-
 1
1 -
2
-
3
-
4
-
5
-
6
-
7
-
8
-
9
-
10
-
11
-
12
-
13
-
14
-
15
-
16
-
17
-
18
-
19
-
20
-
21
-
22
-
23
-
24
-
25
-
26
-
27
-
28
-
29
-
30
-
31
-
32
-
33
-
34
-
35
-
36
-
37
-
38
-
 39
39 -
 40
40 -
 41
41 -
 42
42 -
 43
43 -
 44
44 -
 45
45 -
 46
46 -
 47
47 -
 48
48 -
 49
49 -
50
-
51
-
52
-
53
-
54
-
55
-
56
-
57
-
58
-
59
-
60
-
61
-
62
-
63
-
64
-
65
-
66
-
67
-
68
-
69
-
70
-
71
-
72
-
73
-
74
-
75
-
76
-
77
-
78
-
79
-
80
 |
 |
