Invacare M61 Owners Manual - Page 62
Removing, Installing
 |
View all Invacare M61 manuals
Add to My Manuals
Save this manual to your list of manuals |
Page 62 highlights
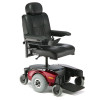
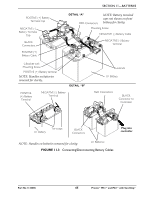
SECTION 11-BATTERIES NOTE: For this procedure, refer to FIGURE 11.2 on page 63. NOTE: If there is battery acid in the bottom of the battery tray or on the sides of the battery, apply baking soda to these areas to neutralize the battery acid. Before reinstalling the existing or new battery, clean the baking soda from the battery tray or battery being sure to avoid contact with skin and eyes. Determine source of contamination. NEVER install/reinstall a battery with a cracked or otherwise damaged case. NOTE: Have the following tools available: TOOL QTY COMMENTS 7/16-INCH (6PT) BOX WRENCH 1 DIAGONAL CUTTERS 1 Not Supplied Not Supplied Removing 1. Place the wheelchair in a well ventilated area where work can be performed without risking damage to carpeting or floor covering. 2. Verify the joystick On/Off switch is in the Off position and disconnect joystick cable (not shown). Refer to Disconnecting/Connecting the Joystick on page 121. 3. Remove the seat. Refer to one of the following procedures: • Van Seats ‐ Refer to Removing/Installing the Seat Assembly on page 48. • ASBA Seats ‐ Refer to Removing/Installing the Seat Assembly on page 57. 4. Remove the top shroud. Refer to Removing/Installing the Top Shroud on page 85. 5. Disconnect the front battery from the controller (BLACK connector). 6. Disconnect the rear battery from the front battery (RED and BLACK connectors). 7. Lift rear and front battery out of the battery tray using the battery handles. Installing 1. Verify the joystick On/Off switch is in the Off position and disconnect joystick cable. Refer to Disconnecting/Connecting the Joystick on page 121. 2. Position the front battery in the front of the battery tray. 3. Position rear battery in rear of battery tray. NOTE: Ensure that both batteries are properly seated and resting on the battery tray. 4. Connect the rear battery to the front battery (RED and BLACK connectors). 5. Connect the front battery to the controller (BLACK connector). 6. Reinstall the top shroud. Refer to Removing/Installing the Top Shroud on page 85. 7. Reinstall the seat. Refer to one of the following procedures: • Van Seats ‐ Refer to Removing/Installing the Seat Assembly on page 48. • ASBA Seats ‐ Refer to Removing/Installing the Seat Assembly on page 57. Pronto® M51™and M61™with SureStep® 62 Part No 1125085
-
 1
1 -
2
-
3
-
4
-
5
-
6
-
7
-
8
-
9
-
10
-
11
-
12
-
13
-
14
-
15
-
16
-
17
-
18
-
19
-
20
-
21
-
22
-
23
-
24
-
25
-
26
-
27
-
28
-
29
-
30
-
31
-
32
-
33
-
34
-
35
-
36
-
37
-
38
-
39
-
40
-
41
-
42
-
43
-
44
-
45
-
46
-
47
-
48
-
49
-
50
-
51
-
52
-
53
-
54
-
55
-
56
-
 57
57 -
 58
58 -
 59
59 -
 60
60 -
 61
61 -
 62
62 -
 63
63 -
 64
64 -
 65
65 -
 66
66 -
 67
67 -
68
-
69
-
70
-
71
-
72
-
73
-
74
-
75
-
76
-
77
-
78
-
79
-
80
 |
 |
