Invacare M61 Owners Manual - Page 77
Installing/Removing the Oxygen Holder
 |
View all Invacare M61 manuals
Add to My Manuals
Save this manual to your list of manuals |
Page 77 highlights
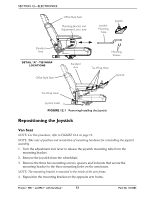
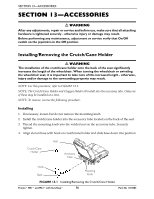
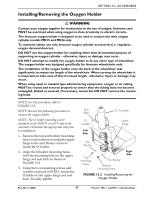
SECTION 13-ACCESSORIES Installing/Removing the Oxygen Holder ƽ WARNING Contact your oxygen supplier for instructions in the use of oxygen. Extreme care MUST be exercised when using oxygen in close proximity to electric circuits. The Invacare oxygen holder is designed to be used in conjunction with oxygen cylinder models MD15 and ME24 only. To maintain safety, use only Invacare oxygen cylinder accessories (i.e. regulator, oxygen demand devices). DO NOT use the oxygen holder for anything other than its intended purpose of supporting an oxygen cylinder - otherwise, injury or damage may occur. DO NOT attempt to modify the oxygen holder to fit any other type of wheelchair. The oxygen holder was designed specifically for Invacare wheelchairs only. The installation of the oxygen holder onto the back of the wheelchair seat significantly increases the length of the wheelchair. When turning the wheelchair it is important to take note of this increased length - otherwise, injury or damage may occur. When using nasal or masked type administering equipment, oxygen or air tubing MUST be routed and secured properly to ensure that the tubing does not become entangled, kinked or severed. If necessary, loosen but DO NOT remove the mounting knob. NOTE: For this procedure, refer to FIGURE 13.2. NOTE: Reverse the following procedure to remove the oxygen holder. NOTE: The O2 holder assembly can be mounted on the RIGHT or LEFT side of the seat back. Determine the appropriate side prior to installation. 1. Remove the top and bottom mounting screws and washers securing the upper hinge to the seat. Retain screws to install the O2 holder. 2. Align the O2holder mounting holes with the mounting holes in the upper hinge and seat back as shown in FIGURE 13.2. 3. Using the two mounting screws and washers removed in STEP 1, secure the O2 holder to the upper hinge and seat back. Securely tighten. Seat Back O2 Holder Left Side O2 Cylinder Upper Hinge Flat Washer Top Mounting Screw Flat Washer Bottom Mounting Screw Right Side FIGURE 13.2 Installing/Removing the Oxygen Holder Part No 1125085 77 Pronto® M51™and M61™with SureStep®
-
 1
1 -
2
-
3
-
4
-
5
-
6
-
7
-
8
-
9
-
10
-
11
-
12
-
13
-
14
-
15
-
16
-
17
-
18
-
19
-
20
-
21
-
22
-
23
-
24
-
25
-
26
-
27
-
28
-
29
-
30
-
31
-
32
-
33
-
34
-
35
-
36
-
37
-
38
-
39
-
40
-
41
-
42
-
43
-
44
-
45
-
46
-
47
-
48
-
49
-
50
-
51
-
52
-
53
-
54
-
55
-
56
-
57
-
58
-
59
-
60
-
61
-
62
-
63
-
64
-
65
-
66
-
67
-
68
-
69
-
70
-
71
-
 72
72 -
 73
73 -
 74
74 -
 75
75 -
 76
76 -
 77
77 -
 78
78 -
 79
79 -
 80
80
 |
 |
