Kenmore 7930 Use and Care Guide - Page 10
Door Alignment - water filter
 |
View all Kenmore 7930 manuals
Add to My Manuals
Save this manual to your list of manuals |
Page 10 highlights
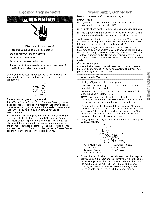
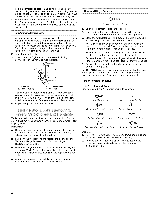
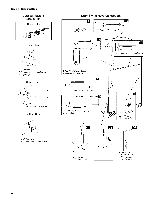
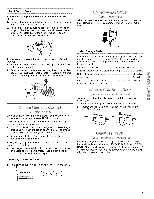
Door Closing Your refrigerator has two front adjustable rollers - one on the right and one on the left. If your refrigerator seems unsteady or you want the doors to close easier, adjust the refrigerator's tilt using the instructions below: 1. Plug into a grounded 3 prong outlet. 2. Move the refrigerator into its final position. 3. Remove the base grille (see "Base Grille" earlier in this section). The two leveling screws are part of the front roller assemblies which are at the base of the refrigerator on either side. 4. Use a screwdriver to adjust the leveling screws. Turn the leveling screw to the right to raise that side of the refrigerator or turn the leveling screw to the left to lower that side. It may take several turns of the leveling screws to adjust the tilt of the refrigerator. NOTE: Having someone push against the top of the refrigerator takes some weight off the leveling screws and rollers. This makes it easier to adjust the screws. System F on (,0], ..S..[.i. yl%e /'t:'c Please read before using the water system. Immediately after installation, follow the steps below to make sure that the water system is properly cleaned. 1. Turn off the ice maker by opening the freezer door and lifting up the wire shutoff arm as shown. 2. Install the interior water filter cartridge (on some models). The interior water filter mounting bracket is located in the upper corner of the fresh food compartment of the refrigerator. NOTE: Do not use with water that is microbiologically unsafe or of unknown quality without adequate disinfection before or after the system. • Carefully remove the interior water filter cartridge from its packaging. Remove the red cap from the cartridge. Apply the appropriate month sticker to the cartridge as a reminder to replace the cartridge within six months. Then apply the "Water Filter Replacement Reminder" sticker to your calendar. Line up the INSTALL mark on the water filter label with the indicator line that is molded into the filter mounting bracket cover. Push the cartridge into the filter mounting bracket. Twist the cartridge V4turn to the right to lock it into place. The REMOVE mark should be lined up with the indicator line located on the front cover. 5. Open both doors again and check to make sure that they close as easily as you like. If not, tilt the refrigerator slightly more to the rear by turning both leveling screws to the right. It may take several more turns, and you should turn both leveling screws the same amount. 6. Replace the base grille. Door Alignment If the space between your doors looks uneven, you can adjust it using the instructions below: 1. Pry off the top hinge cover. 2. Loosen the top hinge screws using a 5/le in. socket or wrench. 3. Have someone hold the door in place or put a spacer between the doors while you tighten the top hinge screws. 4. Replace the top hinge cover. 3. Use a sturdy container to depress the water dispenser bar until the water begins to flow. Flush the water system by dispensing and discarding 2 to 3 gal. (8 to 12 L) of water. Cleaning the system will take approximately 6 to 7 minutes and will help clear air from the line. Additional flushing may be required in some households. NOTE: As air is cleared from the system, water may spurt out of the dispenser. 4. Inspect the filter system for water leaks. If you see water leaks, see the "Troubleshooting" section. 5. Turn on the ice maker by opening the freezer door and lowering the wire shutoff arm as shown. Please refer to the "Ice Maker" section for further instructions on the operation of your ice maker. • Allow 24 hours to produce the first batch of ice. • Discard the first three batches of ice produced. • Depending on your model, you may want to select the maximum ice feature to increase the production of ice. 10
-
 1
1 -
2
-
3
-
4
-
 5
5 -
 6
6 -
 7
7 -
 8
8 -
 9
9 -
 10
10 -
 11
11 -
 12
12 -
 13
13 -
 14
14 -
 15
15 -
16
-
17
-
18
-
19
-
20
-
21
-
22
-
23
-
24
-
25
-
26
-
27
-
28
-
29
-
30
-
31
-
32
-
33
-
34
-
35
-
36
-
37
-
38
-
39
-
40
-
41
-
42
-
43
-
44
-
45
-
46
-
47
-
48
-
49
-
50
-
51
-
52
-
53
-
54
-
55
-
56
-
57
-
58
-
59
-
60
-
61
-
62
-
63
-
64
-
65
-
66
-
67
-
68
 |
 |
