Konica Minolta bizhub 4750 bizhub 4750/4050 Print Functions User Guide - Page 21
Changing the installation settings (Windows 7/8/Server 2008 R2/Server 2012)
 |
View all Konica Minolta bizhub 4750 manuals
Add to My Manuals
Save this manual to your list of manuals |
Page 21 highlights
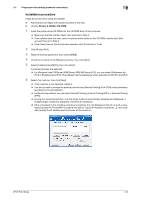
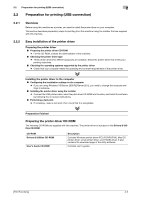
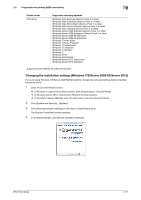
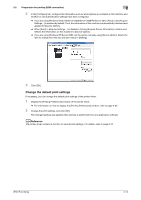
2.2 Preparation for printing (USB connection) 2 Printer driver XPS driver Supported operating systems Windows Vista Business (Service Pack 2 or later)* Windows Vista Enterprise (Service Pack 2 or later)* Windows Vista Home Basic (Service Pack 2 or later)* Windows Vista Home Premium (Service Pack 2 or later)* Windows Vista Ultimate (Service Pack 2 or later)* Windows Server 2008 Standard (Service Pack 2 or later)* Windows Server 2008 Enterprise (Service Pack 2 or later)* Windows Server 2008 R2 Standard Windows Server 2008 R2 Enterprise Windows 7 Home Basic Windows 7 Home Premium* Windows 7 Professional* Windows 7 Enterprise* Windows 7 Ultimate* Windows 8* Windows 8 Pro* Windows 8 Enterprise* Windows Server 2012 Datacenter Windows Server 2012 Standard * Supports 32-bit (e86)/64-bit (e64) environment. Changing the installation settings (Windows 7/8/Server 2008 R2/Server 2012) If you are using Windows 7/8/Server 2008 R2/Server 2012, change the computer settings before installing the printer driver. 1 Open the [Control Panel] window. % In Windows 8, right-click the Start window, then click [All apps] - [Control Panel]. % In Windows Server 2012, click [Control Panel] in the Start window. % In Windows 7/Server 2008 R2, open the Start menu, then click [Control Panel]. 2 Click [System and Security] - [System]. 3 Click [Advanced system settings] on the menu in the left-hand pane. The [System Properties] window appears. 4 In the [Hardware] tab, click [Device Installation Settings]. [Print Functions] 2-11
-
 1
1 -
2
-
3
-
4
-
5
-
6
-
7
-
8
-
9
-
10
-
11
-
12
-
13
-
14
-
15
-
 16
16 -
 17
17 -
 18
18 -
 19
19 -
 20
20 -
 21
21 -
 22
22 -
 23
23 -
 24
24 -
 25
25 -
 26
26 -
27
-
28
-
29
-
30
-
31
-
32
-
33
-
34
-
35
-
36
-
37
-
38
-
39
-
40
-
41
-
42
-
43
-
44
-
45
-
46
-
47
-
48
-
49
-
50
-
51
-
52
-
53
-
54
-
55
-
56
-
57
-
58
-
59
-
60
-
61
-
62
-
63
-
64
-
65
-
66
-
67
-
68
-
69
-
70
-
71
-
72
-
73
-
74
-
75
-
76
-
77
-
78
-
79
-
80
-
81
-
82
-
83
-
84
-
85
-
86
-
87
-
88
-
89
-
90
-
91
-
92
-
93
-
94
-
95
-
96
-
97
-
98
-
99
-
100
-
101
-
102
-
103
-
104
-
105
-
106
-
107
-
108
-
109
-
110
-
111
-
112
-
113
-
114
 |
 |
