Konica Minolta bizhub 4750 bizhub 4750/4050 Print Functions User Guide - Page 70
Available operations in the [Finish] tab, Each Job], [Header Each Copy]
 |
View all Konica Minolta bizhub 4750 manuals
Add to My Manuals
Save this manual to your list of manuals |
Page 70 highlights
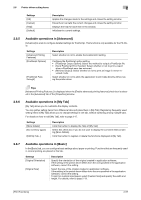
2.6 Printer driver setting items 2 2.6.9 Available operations in the [Finish] tab The [Finish] tab allows you to configure a setting for finishing printed materials. Settings [Staple] Description Select this check box to staple printed sheets of paper. Select the staple position from the left or right corner. Tips To use the staple function, the optional Finisher is required. 2.6.10 Available operations in the [Cover Mode] tab In the [Cover Mode] tab, you can insert covers and pages. Settings [Front Cover] [Back Cover] [Separator Page] Description Select this check box to insert and print on a front cover. In [Front Cover Tray], select the paper tray for the front cover. Then, select whether or not to print on the inserted front cover. • [Blank]: Nothing is printed on the inserted front cover. • [Printed (1-Sided)]: Select this option to print on one side of the sheet that is inserted as a front cover. • [Printed (2-Sided)]: Select this option to print on both sides of the sheet that is inserted as a front cover. You can set this option when you have selected anything other than [Auto] in [Paper Tray] in the [Basic] tab. Select this check box to insert and print on a back cover. In [Back Cover Tray], select the paper tray for the back cover. Then, select whether or not to print on the inserted back cover. • [Blank]: Nothing is printed on the inserted back cover. • [Printed (1-Sided)]: Select this option to print on one side of the sheet that is inserted as a back cover. • [Printed (2-Sided)]: Select this option to print on both sides of the sheet that is inserted as a back cover. You can set this option when you have selected anything other than [Auto] in [Paper Tray] in the [Basic] tab. Select this check box when inserting a separator sheet for each job or copy to make prints. Then, select the position to insert a separator page from [Header (Each Job)], [Header (Each Copy)], and [Trailer (Each Copy)]. In [Separator Page Tray], select a paper tray to load sheets to be used as separator pages. You can set this option when you have selected anything other than [Auto] in [Paper Tray] in the [Basic] tab. 2.6.11 Available operations in the [Stamp/Composition] tab In the [Stamp/Composition] tab, you can configure settings for adding text or an image to the original. Settings [Watermark] [Copy Protect] (PCL only) [Create Overlay File] (PCL/XPS) [Print in Overlay] Description Select this check box to print a watermark (text stamp) on the original. In addition, from the list, select the watermark you want to print. Clicking [Edit...] allows you to register or edit a watermark. For details, refer to page 2-29. Select this check box to print a text such as "Copy" or "INTERNAL USE" in the background pattern as concealed text. When you click [Edit...], you can configure detailed settings such as Copy Protect printing items or the printing method. For details, refer to page 2-31. Select this check box to save data created in application software on the computer as an overlay image to be composed on the original. For details, refer to page 2-31. Select this check box to compose the created overlay image on the original when printing. For details, refer to page 2-30. [Print Functions] 2-60
-
 1
1 -
2
-
3
-
4
-
5
-
6
-
7
-
8
-
9
-
10
-
11
-
12
-
13
-
14
-
15
-
16
-
17
-
18
-
19
-
20
-
21
-
22
-
23
-
24
-
25
-
26
-
27
-
28
-
29
-
30
-
31
-
32
-
33
-
34
-
35
-
36
-
37
-
38
-
39
-
40
-
41
-
42
-
43
-
44
-
45
-
46
-
47
-
48
-
49
-
50
-
51
-
52
-
53
-
54
-
55
-
56
-
57
-
58
-
59
-
60
-
61
-
62
-
63
-
64
-
 65
65 -
 66
66 -
 67
67 -
 68
68 -
 69
69 -
 70
70 -
 71
71 -
 72
72 -
 73
73 -
 74
74 -
 75
75 -
76
-
77
-
78
-
79
-
80
-
81
-
82
-
83
-
84
-
85
-
86
-
87
-
88
-
89
-
90
-
91
-
92
-
93
-
94
-
95
-
96
-
97
-
98
-
99
-
100
-
101
-
102
-
103
-
104
-
105
-
106
-
107
-
108
-
109
-
110
-
111
-
112
-
113
-
114
 |
 |
