Kyocera KM-2030 Print System K Instruction Handbook (Functions) - Page 46
Printer Driver for Windows 95/98
 |
View all Kyocera KM-2030 manuals
Add to My Manuals
Save this manual to your list of manuals |
Page 46 highlights
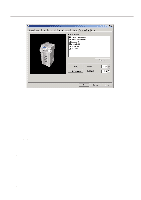
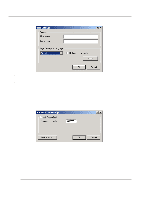
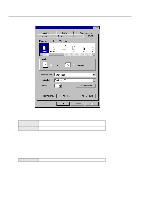
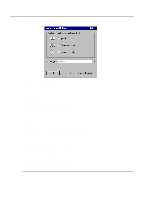
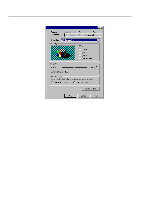
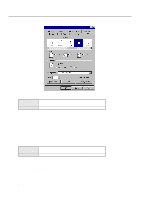
33..PrPinrteirnDtrieverr fDorrWiivndeorwsfo95r/98Windows 95/98 The following procedure explains the functions of the Universal driver and the KPDL2 driver for those who use Windows 95 or Windows 98 as their operating system. * This Instruction Handbook uses illustrations from the message display of the 20 ppm copier for purposes of explanation, but the actual basic operation procedure is the same for 15 ppm copiers as well. * Depending upon version upgrades of the printer driver, the screenshots shown here may differ somewhat from that of the actual printer driver. * Depending upon the model of your copier, there may be functions that are not supported or that require optional equipment to be installed. Even if the settings for such functions are performed, they will not be effective. * Refer to the Instruction Manual for Windows or to On-Line Help for information regarding items that are not explained in this Instruction Handbook. * Two printer drivers have been included with this product: a standard printer driver and a Collator-compatible driver. Refer to "1. Procedure for Installing and Printing with a Printer Driver" on page 1-1 for more detailed information. * If you use the KPDL2 driver, be sure to set the emulation mode in the printer to "KPDL" or "KPDL(AUTO)". 3-1 Opening the Properties Window 1 Start Windows 95 or Windows 98. 2 Click on [Start] on the task bar. The Start menu will appear. 3 Use the mouse to point to [Settings]. A submenu will appear, so click on [Printers]. The [Printers] folder will open. 4 Use the right mouse button to click on the icon for this printer. A pop-up menu will be displayed. Select [Properties] from the menu. The Properties window will appear. 3-1
-
 1
1 -
2
-
3
-
4
-
5
-
6
-
7
-
8
-
9
-
10
-
11
-
12
-
13
-
14
-
15
-
16
-
17
-
18
-
19
-
20
-
21
-
22
-
23
-
24
-
25
-
26
-
27
-
28
-
29
-
30
-
31
-
32
-
33
-
34
-
35
-
36
-
37
-
38
-
39
-
40
-
 41
41 -
 42
42 -
 43
43 -
 44
44 -
 45
45 -
 46
46 -
 47
47 -
 48
48 -
 49
49 -
 50
50 -
 51
51 -
52
-
53
-
54
-
55
-
56
-
57
-
58
-
59
-
60
-
61
-
62
-
63
-
64
-
65
-
66
-
67
-
68
-
69
-
70
-
71
-
72
-
73
-
74
-
75
-
76
-
77
-
78
-
79
-
80
-
81
-
82
-
83
-
84
-
85
-
86
 |
 |